Geeky macOS Setup for Productivity
In this post, I would like to share my macOS setup, which I have developed over the years through my experience in programming and general computer usage. Every small amendment to my common routines stemmed from a fundamental need: how can I eliminate the time spent on repetitive actions? Initially, not everything was obvious, and it took time for me to realize that it was even possible. This is why I am sharing it and hoping that you will find some tips and tricks that will work well for you.
I’d like to note that I describe my own setup and don’t urge you to copy it word for word. You may tweak individual shortcuts as you want, and you may skip whole sections altogether. The goal is to show you what I found useful and what you might not have thought of, and in no way to force you to thoughtlessly copy the approaches. Use this info to help you build your own! Believe me, it’s a fun, never-ending story.
Principles
What you may find here can seem too much. And it may seem there are other ways to make it more convenient. I don’t want to argue. You may follow your own understanding of what convenience and beauty are and what suits your needs best. What I want to highlight again, however, is that I didn’t get from a newbie to the current state in my relationship with the computer overnight. Not even in a year. So as my relationship matured, I tried and learned new approaches and adjusted the way I interact with my computer. What guided me, as I believe, were the following principles:
- Reduce repetitiveness.
- Try to make it faster.
- Explore what others do and see how it suits me.
Guided by these principles, I learn shortcuts for the interactions I do the most, write scripts for something that needs automation, look at documentation and available extensions, and so forth.
General
The first thing I do when I install my operating system is download Raycast. Why? Because it completely changes the way I interact with my laptop. I configure it so that it replaces Spotlight and can be opened by pressing ⌘ + ␣ (Command + Space). Some people prefer Alfred for similar reasons, but I stick with Raycast since it allows extensions with its free version. What I miss in the free version is the ability to sync the setup across devices, but it hasn’t been a big issue for me.
So why would I replace the default Spotlight? The thing is, Raycast is not just another version of Spotlight. It not only performs searches but also extends your Mac to support commands that integrate all your apps into a single prompt. You can open applications, open your bookmarks in the browser, search for your notes in a third-party app like Notion, make a ChatGPT prompt, initiate a new repository, open an Xcode project, and so on. The possibilities are almost limitless, and I have only mentioned a few that I use most of the time.
App Launch & Window Switching
The first thing you probably do after you boot your laptop is open your favorite application. Clicking on an icon is good, but it can be a little time-consuming. Search is a little better if you type fast (and it’s the way I often launch apps that I don’t use very often), but another nerdy way is to assign a particular shortcut to a set of apps that you use the most. With Raycast, you can use this shortcut not only to open, but to switch to the windows of an opened application, which can be way faster than both clicking on an icon in the dock or using ⌘ + ⇥ (Command + Tab).
I tried to create a pattern that would not overlap with existing shortcuts and decided to stick with ⌃ + ⌥ + ⌘ (Control + Option + Command) and another key of preference, typically one that I can somehow associate with the application, like I for iTerm, X for Xcode, or M for Spotify (i.e., Music). Some I chose with the notion to be able to type it quicker, like , for ChatGPT (which I’ve been using a lot since the app was released).
My current shortcuts, each starting with ⌃ + ⌥ + ⌘ (Control + Option + Command), are:
| Key | Application | Comment |
|---|---|---|
X | Xcode | My main IDE for everything Swift / Objective-C |
S | Xcode Simulator | |
I | iTerm | My favorite terminal |
Z | Figma | Z just to be close to Xcode because sometimes I switch between these apps every minute to make something as in the sketch |
, | ChatGPT | , is just a convenient key that my middle finger can reach easily |
V | Visual Studio Code | I use it for scripting, viewing text-based files, and writing this blog post |
B | Firefox | The Browser that I use |
T | Telegram | Extremely convenient cross-platform messenger |
M | Spotify | My favorite Music player |
N | Notion | My current Note-taking app |
J | IntelliJ IDEA | For Kotlin programming |
A | Android Studio | For Android and Kotlin Multiplatform |
R | iBooks | For Reading eBooks on programming. Also convenient to switch back and forth when I reproduce some code samples in a code editor |
F | Finder | To open Finder windows |
D | Diagrams.net (formerly draw.io) | I occasionally draw UML diagrams with it |
C | Anki | I use it to study with cards and spaced repetition |
P | Proxyman | A proxy tool for debugging and mocking network responses |
Effective Search
I almost never use Finder to navigate through my file hierarchies. That’s why I mostly keep them flat (e.g., I put every PDF or Word document in my iCloud Drive Documents folder) and try to name them in a way that allows easy searching in the future.
I use Raycast for search and invoke it with ⇧ + ⌃ + ⌘ + F (Shift + Control + Command + F), where F stands for Find. I noticed that it works much better than Spotlight, which sometimes cannot find particular documents on my laptop.
As you can observe, I also use a special pattern for search commands: ⇧ + ⌃ + ⌘ (Shift + Control + Command) plus a letter, typically the one used to open the same application. Here are the ones I currently use:
| Key | Application / Service | Raycast Extension Link | Comment |
|---|---|---|---|
F | Search Files | Raycast built-in | File search |
D | DuckDuckGo | Raycast built-in | Open the query in the default browser. You can use the search engine of your preference |
N | Notion | Link | Notes search |
G | Google Workspace | Link | Search for my Google Drive files (I don’t store them locally) |
B | Browser Bookmarks | Link | Search for my bookmarks |
H | Browser History | Link | Search for browser history |
X | Xcode | Link | Open recent Xcode projects |
V | Visual Studio Code | Link | Open recent VS Code projects |
R | Github | Link | Github repository search |
In-app search is the primary reason why I use different Raycast extensions, but don’t hesitate to explore other possibilities like project or document creation, derived data deletion, player control, and so on. I usually just type in such commands, about which below.
Commands
Whenever you need something, you usually have two ways: a long one, such as clicking through app launchers, folders, and menus, and a short one, like pressing a combination of keys (literally, a shortcut). As you have probably guessed, I prefer the latter for speed. However, I’m not so crazy as to remember every possible shortcut in the system. That’s where the search function comes in handy as my ultimate guide.
Want to lock the screen? Open Raycast and type “lock” instead of remembering the shortcut. Want to open Privacy & Security settings to allow the launch of some recently installed app? Just type in “Privacy” and proceed directly to that part of the Settings app. “Hide all apps”? Here you go! You get the idea. Search is usually faster and it doesn’t take as much effort as exact shortcut memorization.
But here’s one shortcut I recommend you memorize. I use it a lot. You’ve probably noticed that every app has that Menu Bar that may contain an infinity of commands. Some of them have their own shortcuts, but we’ve already discussed that we don’t want to memorize every possible shortcut. Here’s where our hero comes in:
⇧+⌘+/(Shift+Command+Slash): Search any command in the Menu Bar.
I would also like to get you acquainted with another app usage pattern that may be called the Command Palette, which is triggered by ⇧ + ⌘ + P (Shift + Command + P) in VS Code, or Quick Actions ⇧ + ⌘ + A (Shift + Command + A) in Xcode. It usually brings up a prompt that allows searching for different commands of the app and can even allow natural language input. I prefer first using this feature and only switching to the Menu Bar search when there’s no special command launcher in the app.
Window Management
Most of us work with multiple apps, frequently switching between their windows. Some apps can have more than one window, so it may be cumbersome to keep focus on the ones that you really need at the moment. Over the years, I have tried different approaches: using a second monitor, assigning particular apps to particular virtual desktops, using Stage Manager, and just having everything on a single screen (I rarely even have the need to use a second monitor now).
Every approach has pros and cons, and I’ll elaborate on why the last one worked perfectly for me:
- Predictability: as I mentioned, the shortcuts to open/switch to different apps make the workflow predictable — whenever I need to switch to the browser, I just press the associated shortcut. I never find myself pressing the shortcut only to find there is no window in the right place, as may happen with multiple desktops.
- Flexibility: also the reason why I gave up on multiple desktops — sometimes I need different combinations of apps present on the same screen. It’s simpler to keep everything on one desktop and change the layout (more about it below) according to specific needs.
- Speed: I love macOS animations, they’re really cute, but at the same time, they’re a waste of precious seconds that is repeated throughout the day. That’s why I don’t like desktop switching, as well as the fancy Stage Manager.
Below I will show you how to get the most out of this approach.
Basic Shortcuts
I’ve already shown you some custom shortcuts to launch apps and perform searches, but don’t forget about the default ones that can be extremely useful:
⌘+⇥(Command+Tab): Switch to the next most recently used app among your open apps.⌘+`(Command+Grave accent): Switch between the windows of the app you’re using. It switches only between the apps on the same desktop, so using only one, you’ll never miss a window. A nice feature to mention here is App Exposé, which can be triggered by a swipe down with three fingers if you enable it in Settings. It can be convenient sometimes to get a grasp of all your windows related to the same app, but mostly I still stick with just the shortcut.
Simple as that.
Layout
Starting from macOS Sequoia, there’s a feature called Window tiling. I haven’t used it at the time of writing, but I value it as a nice move from the perspective of OS development, and maybe it can even replace third-party solutions.
There are different window managers available. Raycast comes with a built-in Window Management functionality. I never used this one as I saw I had to set shortcuts for every layout position manually.
I used Magnet for a long time but then I decided to switch to the free alternative Rectangle. To me, they’re identical. I memorized different shortcuts and even added little adjustments to them. Here are the ones that I use most often:
| Shortcut | Description |
|---|---|
⌃ + ⌥ + ← / → (Control + Option + Left Arrow / Right Arrow) | Change current window size to fit the left / right half of the screen |
⌃ + ⌥ + ↩ (Control + Option + Return) | Almost maximize |
⌃ + ⌥ + ⌘ + ↩ (Control + Option + Command + Return) | Maximize |
⌃ + ⌥ + ⌫ (Control + Option + Backspace) | Restore size |
⌃ + ⌥ + C (Control + Option + C) | Center in the screen |
I rarely use the others but I do when I need to fit more than two apps on the screen. An example of such a situation: I code (VS Code), I read the guide (Browser or Books), and I want to see the result (Browser with a local build of my project).
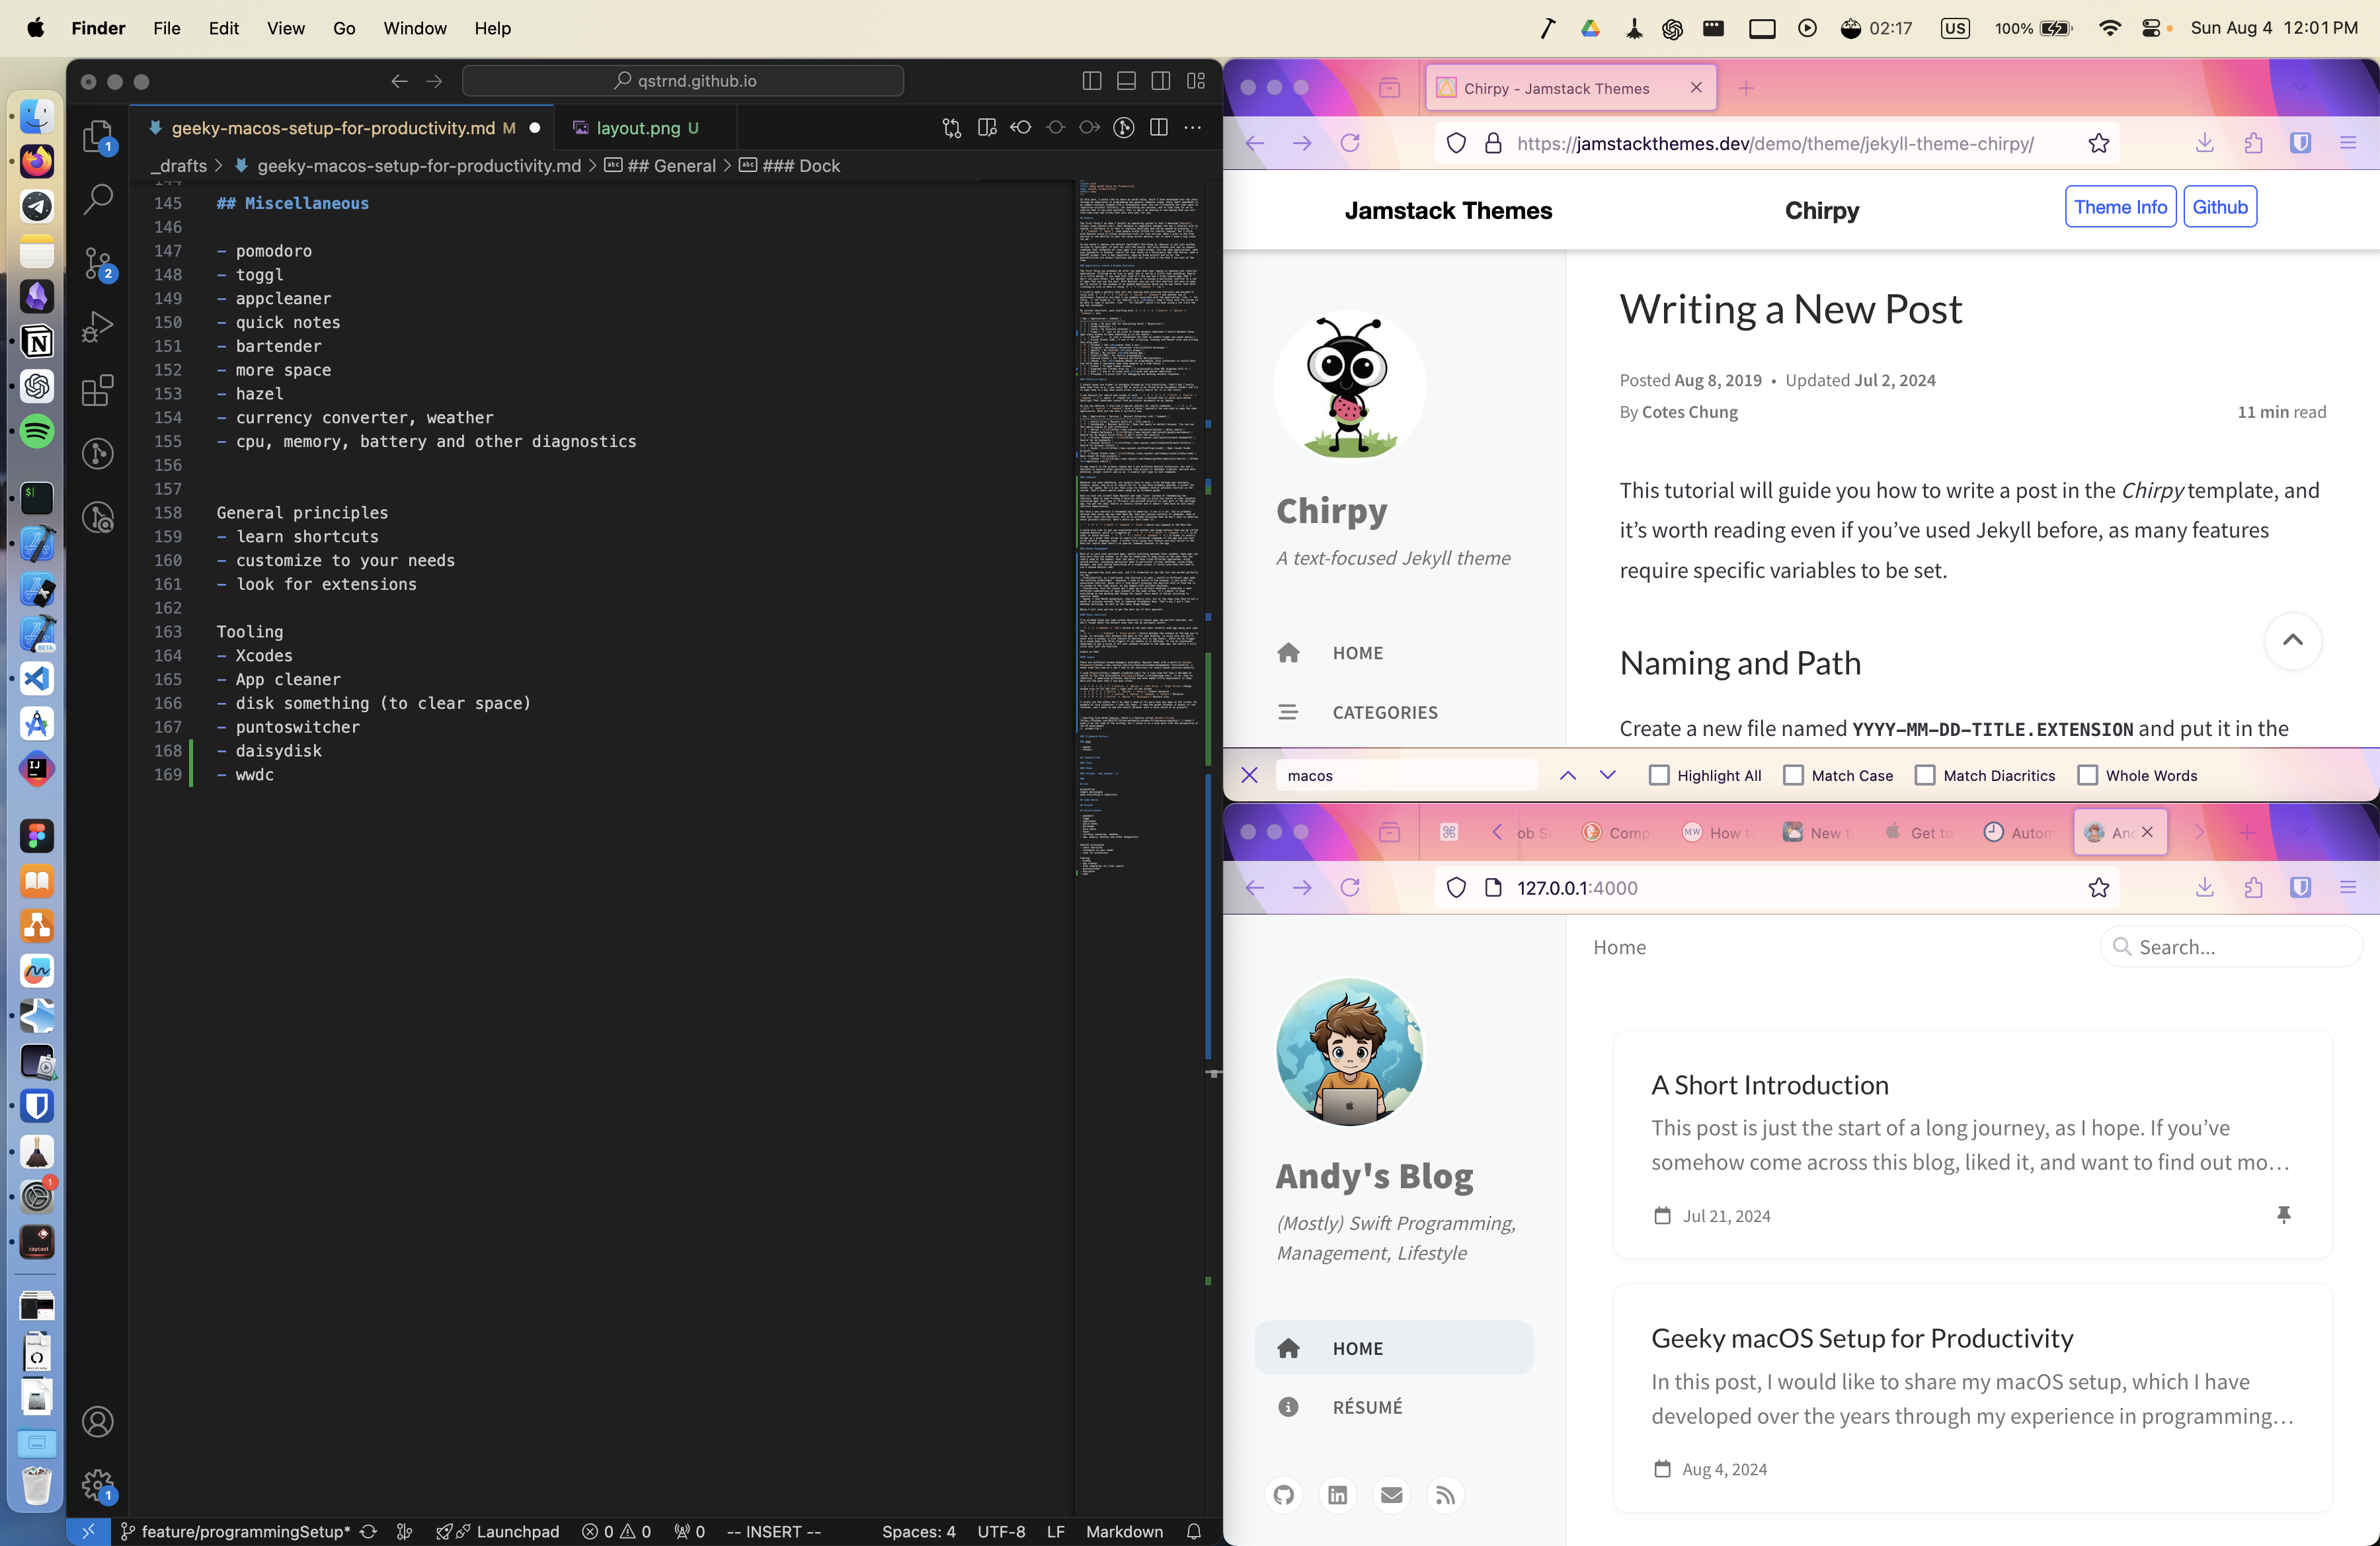 My layout of three applications fitting on the same screen
I never use Full-screen Mode except for movies and videos that I really want to focus on. I just maximize the window I need. The reasoning stays the same: I try to escape additional desktops for simpler navigation.
Clipboard History
Another staple feature, and one I am so deeply surprised to see many people are not aware of, is a clipboard history. It’s especially useful when you’re dealing with chunks of code and commands. It can also be a registry of quick-access info, such as your email address or your current task tickets (hello to Jira users).
I’ve been using Raycast’s built-in Clipboard History since it’s free and it works perfectly for me. To use it, I type ⇧ + ⌘ + V (Shift + Command + V). It can work with different kinds of data (not only text-based), has previews (for example, for copied color names, images, or web articles), and stores your data for up to three months in the free-tier Raycast version.
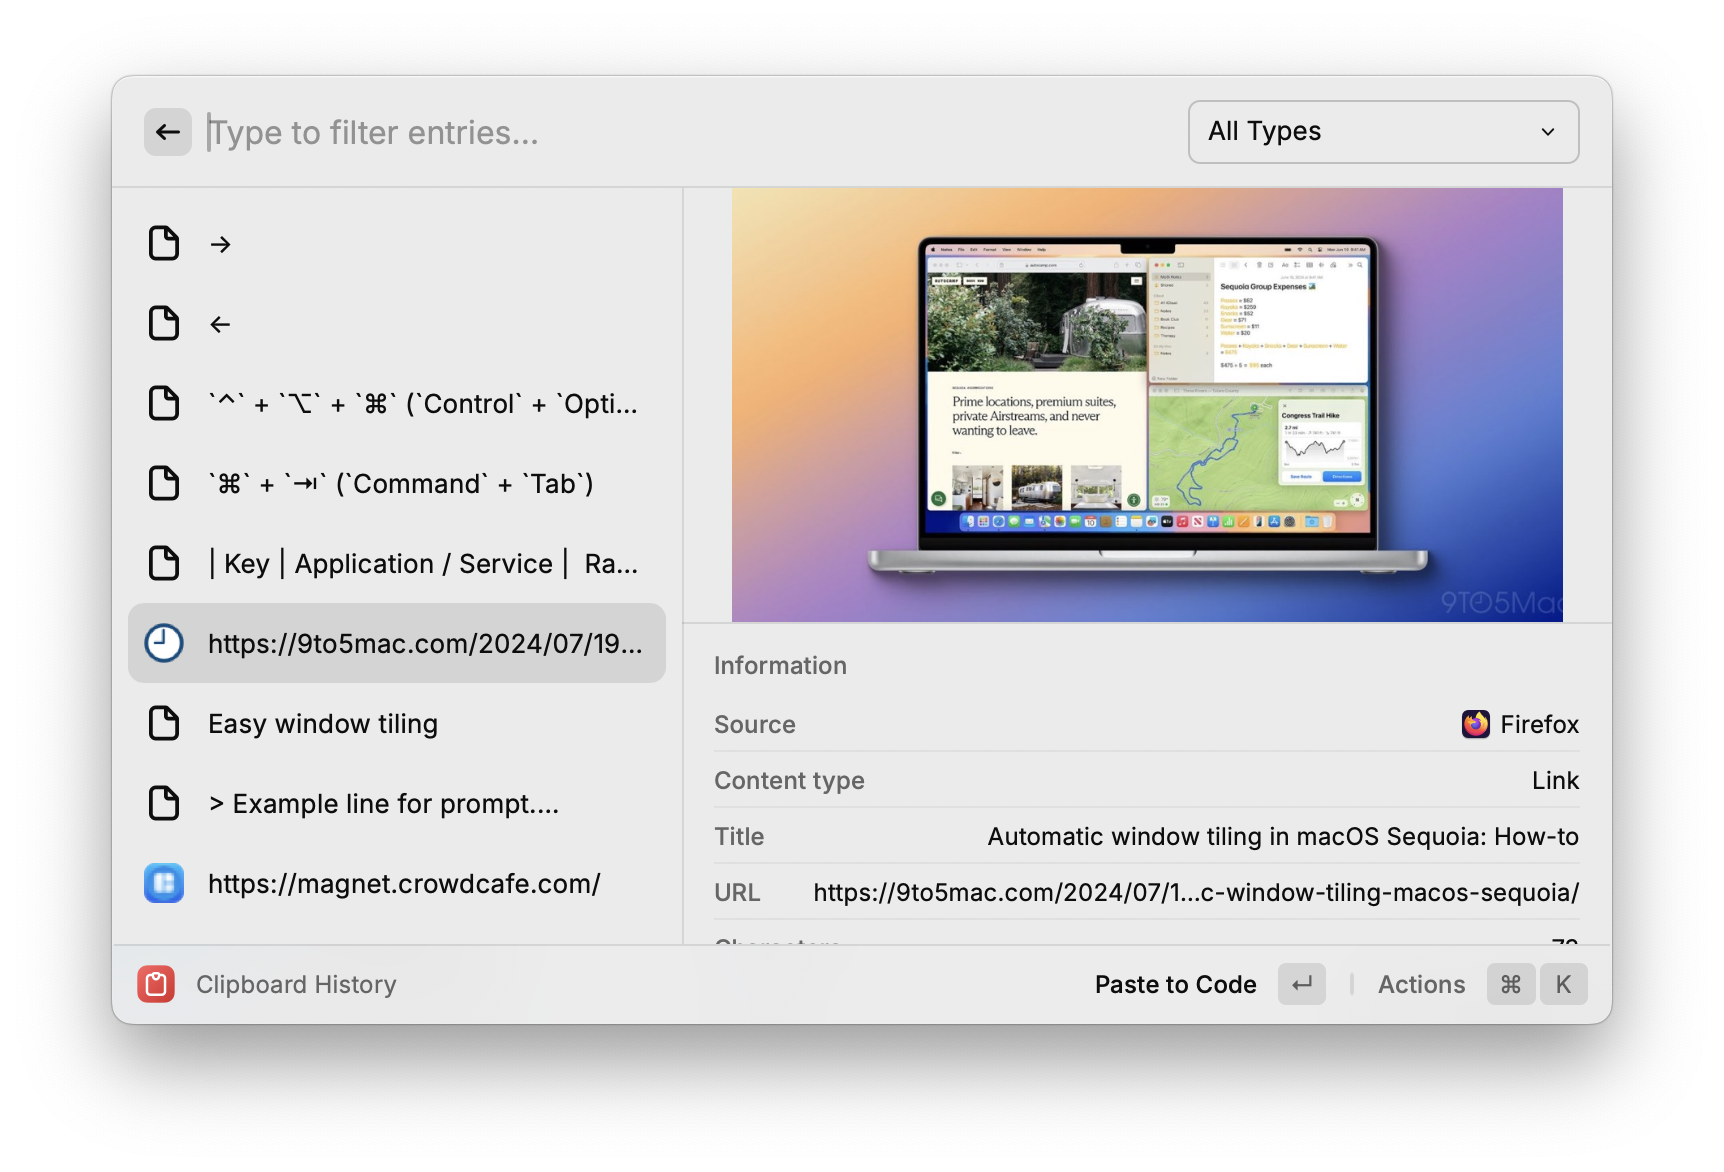 A piece of my current clipboard history
There are, however, some features that I miss from my beloved Paste. It has unlimited storage, cloud sync, categories, special titles for the content you save, and so on. You can use it not only as a clipboard but as a separate database: for your code snippets, common text that you repeat in your communication, and more. The only downside is that it’s kind of pricey, and at some point, I decided to stick to a more affordable solution.
Dock
Another thing that surprises me is that people leave the default Dock as is. In my opinion, you should remove the apps that you don’t use that often from the Dock.
One more trick is to group applications, and you can add a spacer for it with the following commands (use the terminal to type them).
Add a Regular Spacer:
1
defaults write com.apple.dock persistent-apps -array-add '{"tile-type"="spacer-tile";}'; killall Dock
Add a Small Spacer
1
defaults write com.apple.dock persistent-apps -array-add '{"tile-type"="small-spacer-tile";}'; killall Dock
And there’s another thing: folders! You can put any folder for quick access to your Dock, just find it in Finder or search with Spotlight/Raycast and drag and drop it near the default Downloads folder (also note that you can remove it if you want). In my dock, besides the Downloads folder, I also have Desktop (much easier than getting docs from the desktop behind the windows, especially if you plan to drop the file somewhere), Documents, and Screenshots.
I prefer the Dock on the left side, but I temporarily put it on the bottom to take this screenshot. I don’t use groups strictly as you can see, but it just helps my eyes to find the needed app quicker.
 My Dock
I already mentioned it and I’ll repeat: whenever I can, I launch/switch to apps and search for files with either shortcuts or Raycast. But I still love the Dock to be present and never hide it (except for full screen).
Cleanup
As we work, we produce a lot of artifacts: downloaded images and documents, code files and projects, installed applications, caches, and more. It’s as natural for the tech world as it is in nature itself. Sometimes you want to take more control over what should be kept and what should be discarded. I use several apps that help me in this aspect.
Downloads & Desktop
I love Hazel to add some very basic automation rules to the very basic Downloads & Desktop folders. They’re simple: delete the files that are there for more than a month and I haven’t opened them for the same period; gather all downloaded documents of different kinds to my iCloud Documents folder; move all screenshots to my Screenshots folder. Also, I have my Trash automatically cleaned of files that are older than a month. Some people use it for more strict categorization of their files, but as of now, I don’t have such a need.
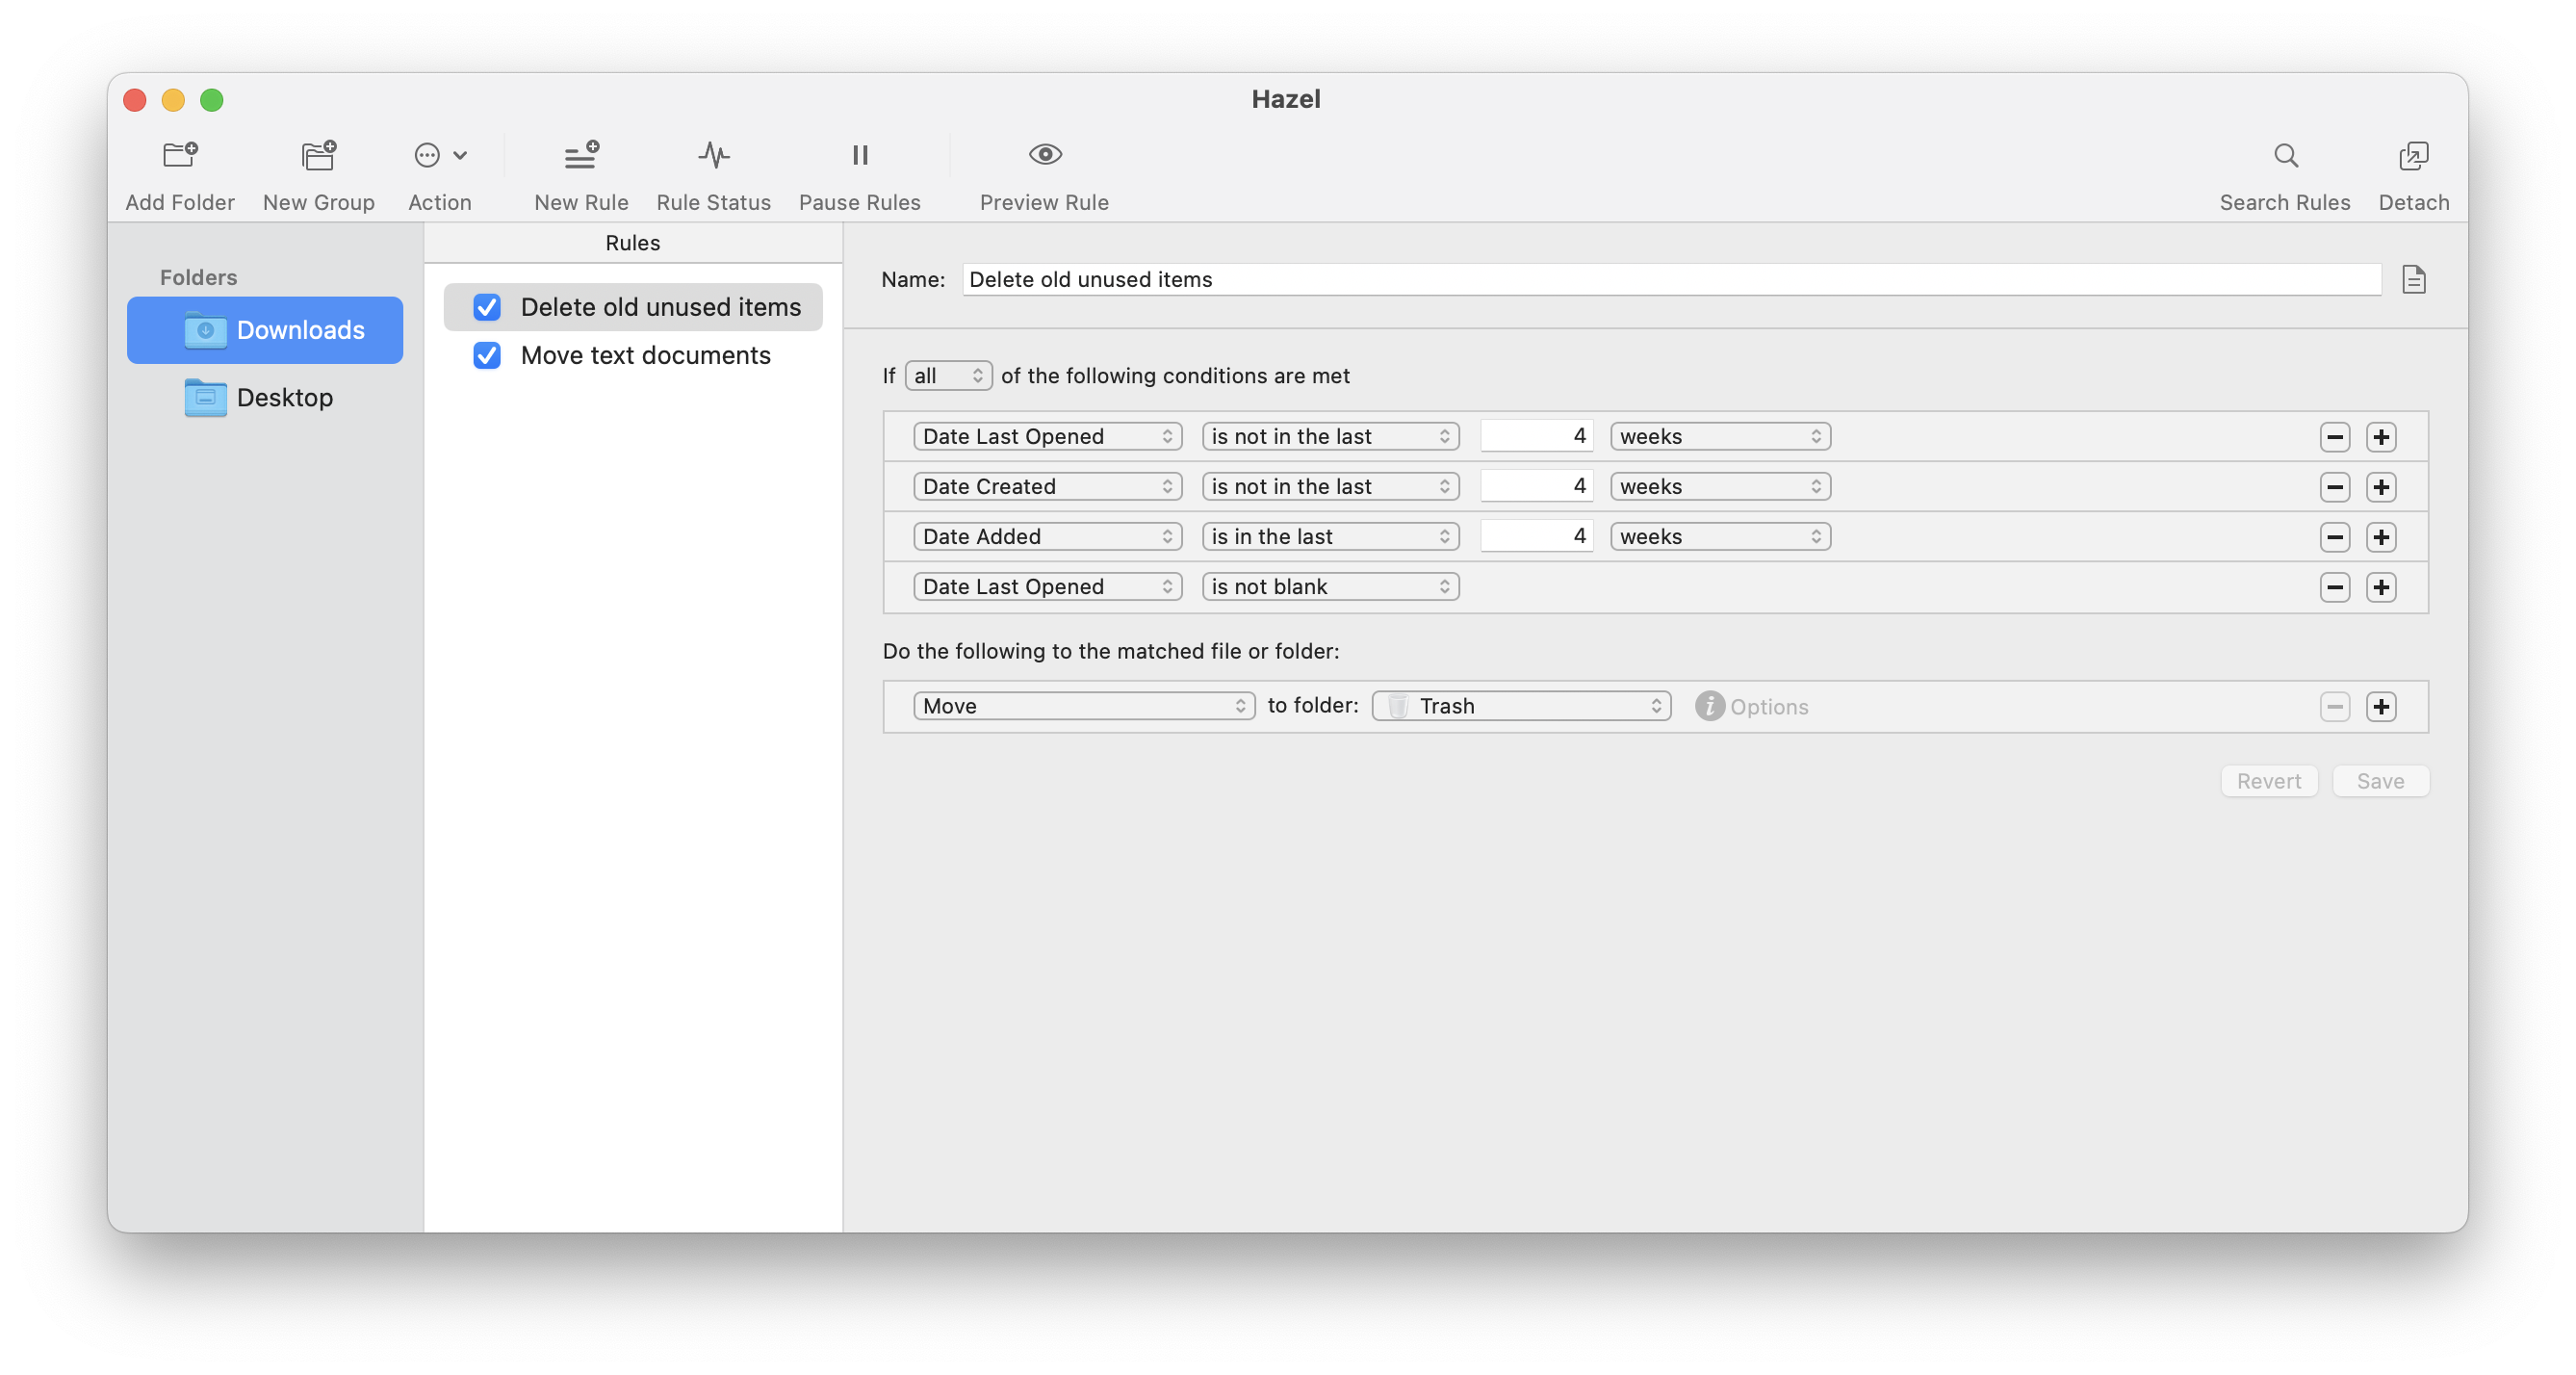 My rules in Hazel app
I should also mention that the app is not free, but it’s a one-time purchase and I think it’s worth it. If you decide to give it a try and would like to import my rules to start with, you can download them here.
Unused Apps
I use the free AppCleaner. Whenever I want to delete an app from my Mac, I don’t just move the app icon to the Trash folder, but drag and drop it to this cleaner. It tries to find caches and other leftovers from the app you’re about to delete, as you can see in the screenshot below. So it makes your uninstallation cleaner!
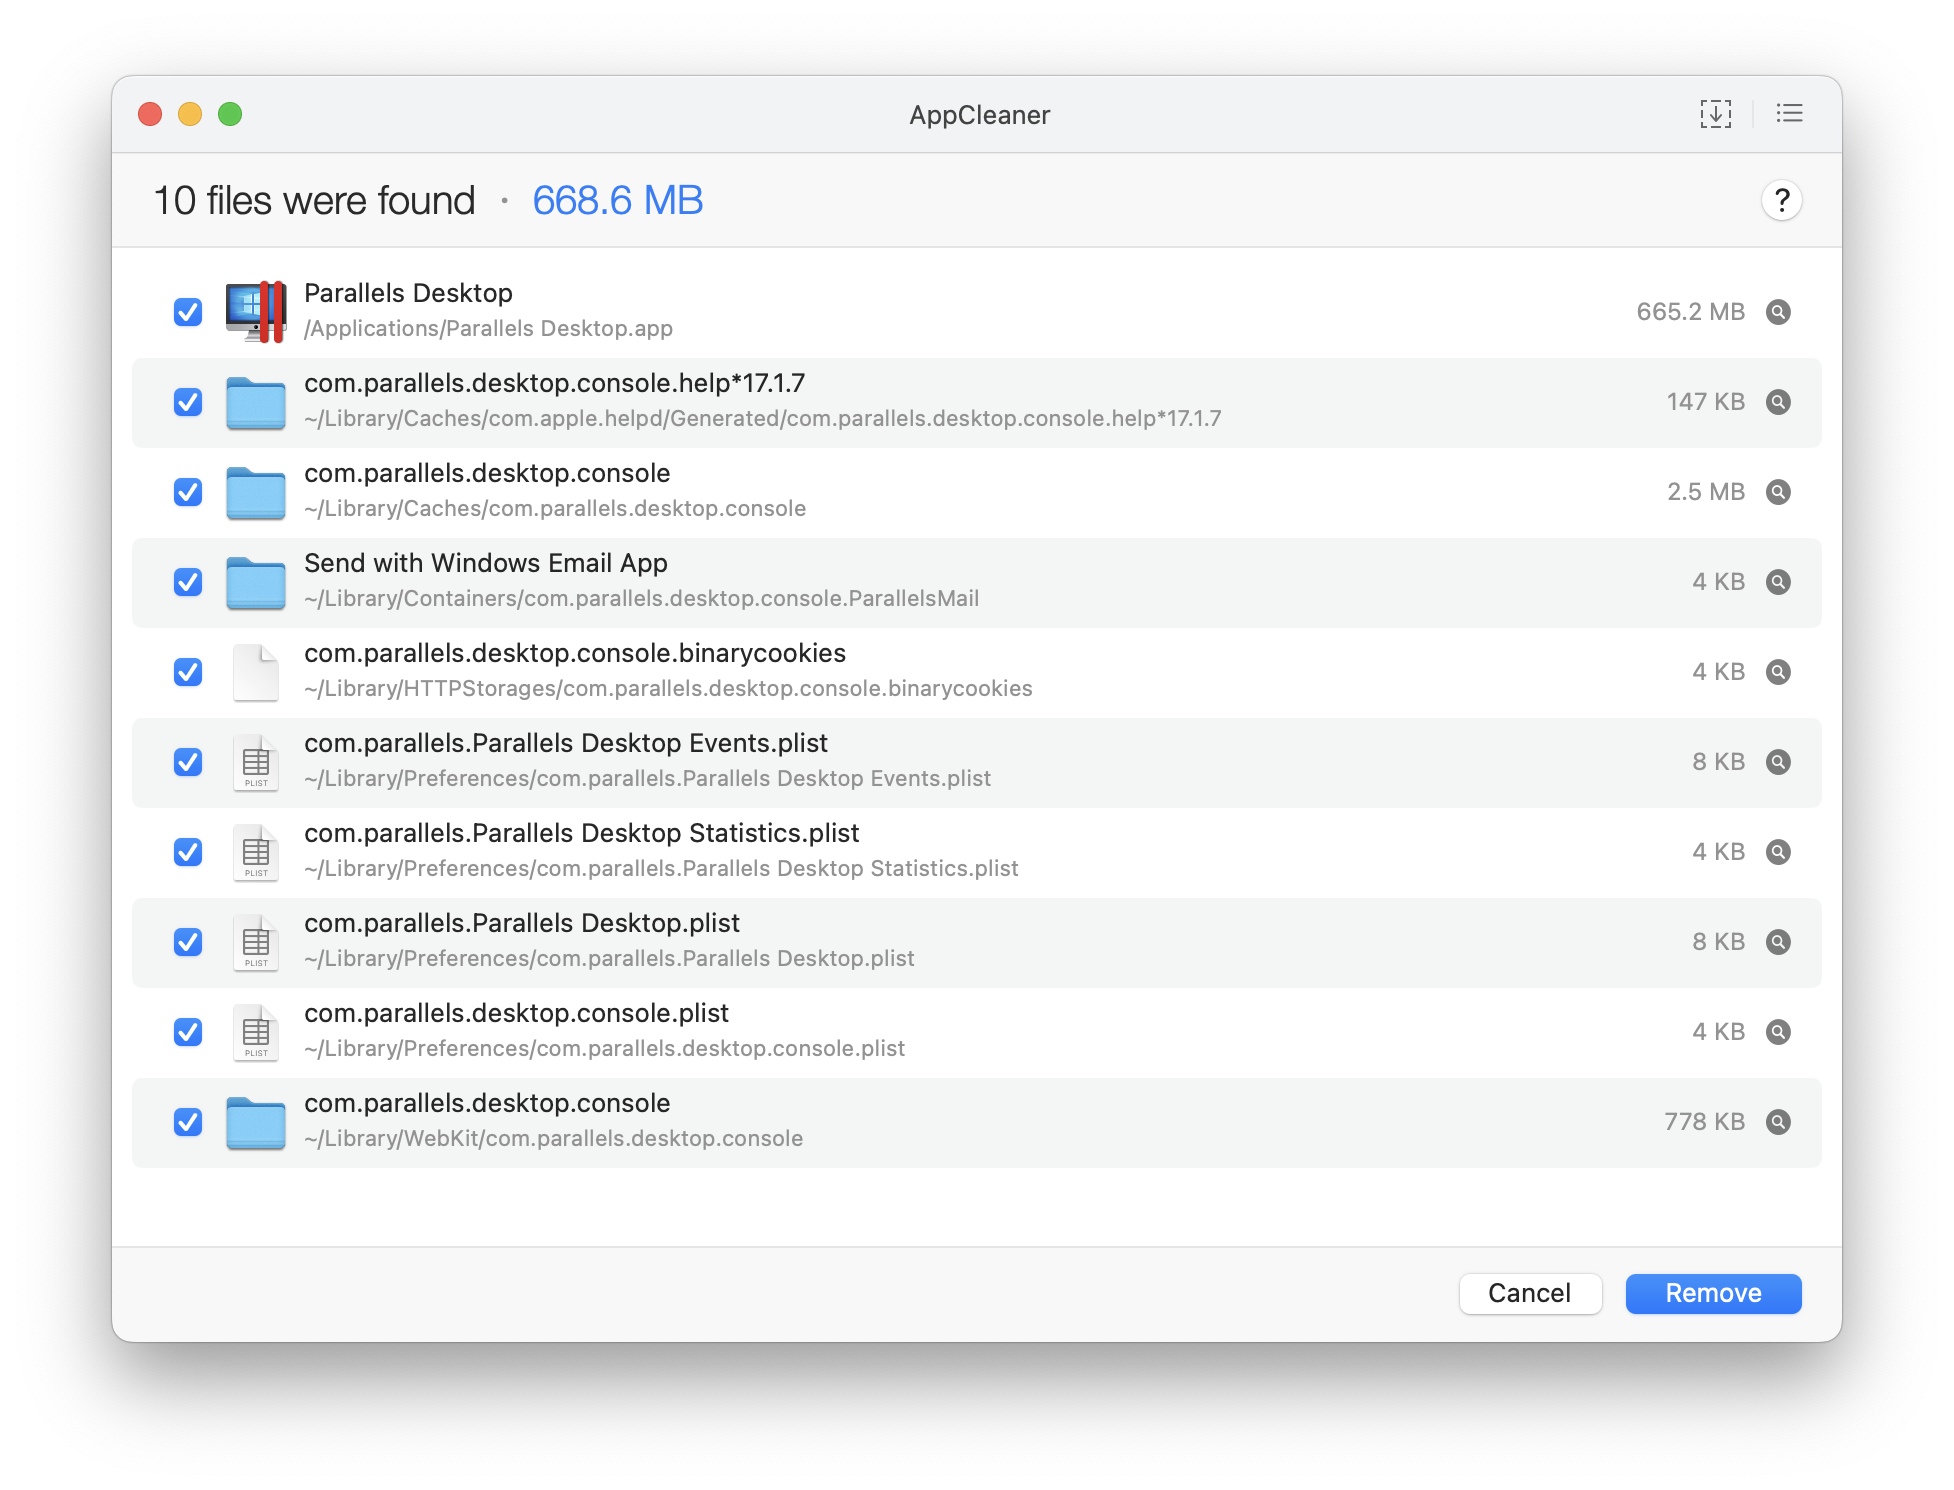 Attempting to delete Parallels (just for example!)
There’s also a famous app called CleanMyMac which you can use to delete apps and do more. But to me, it’s a little overpriced since it requires a subscription.
Storage
I have to admit, I still haven’t dealt with the infamous Mac System Data is large problem completely. It’s a pain, especially for developers, since our work involves involuntary production of many caches, logs, and other data that may be there but in fact is not needed.
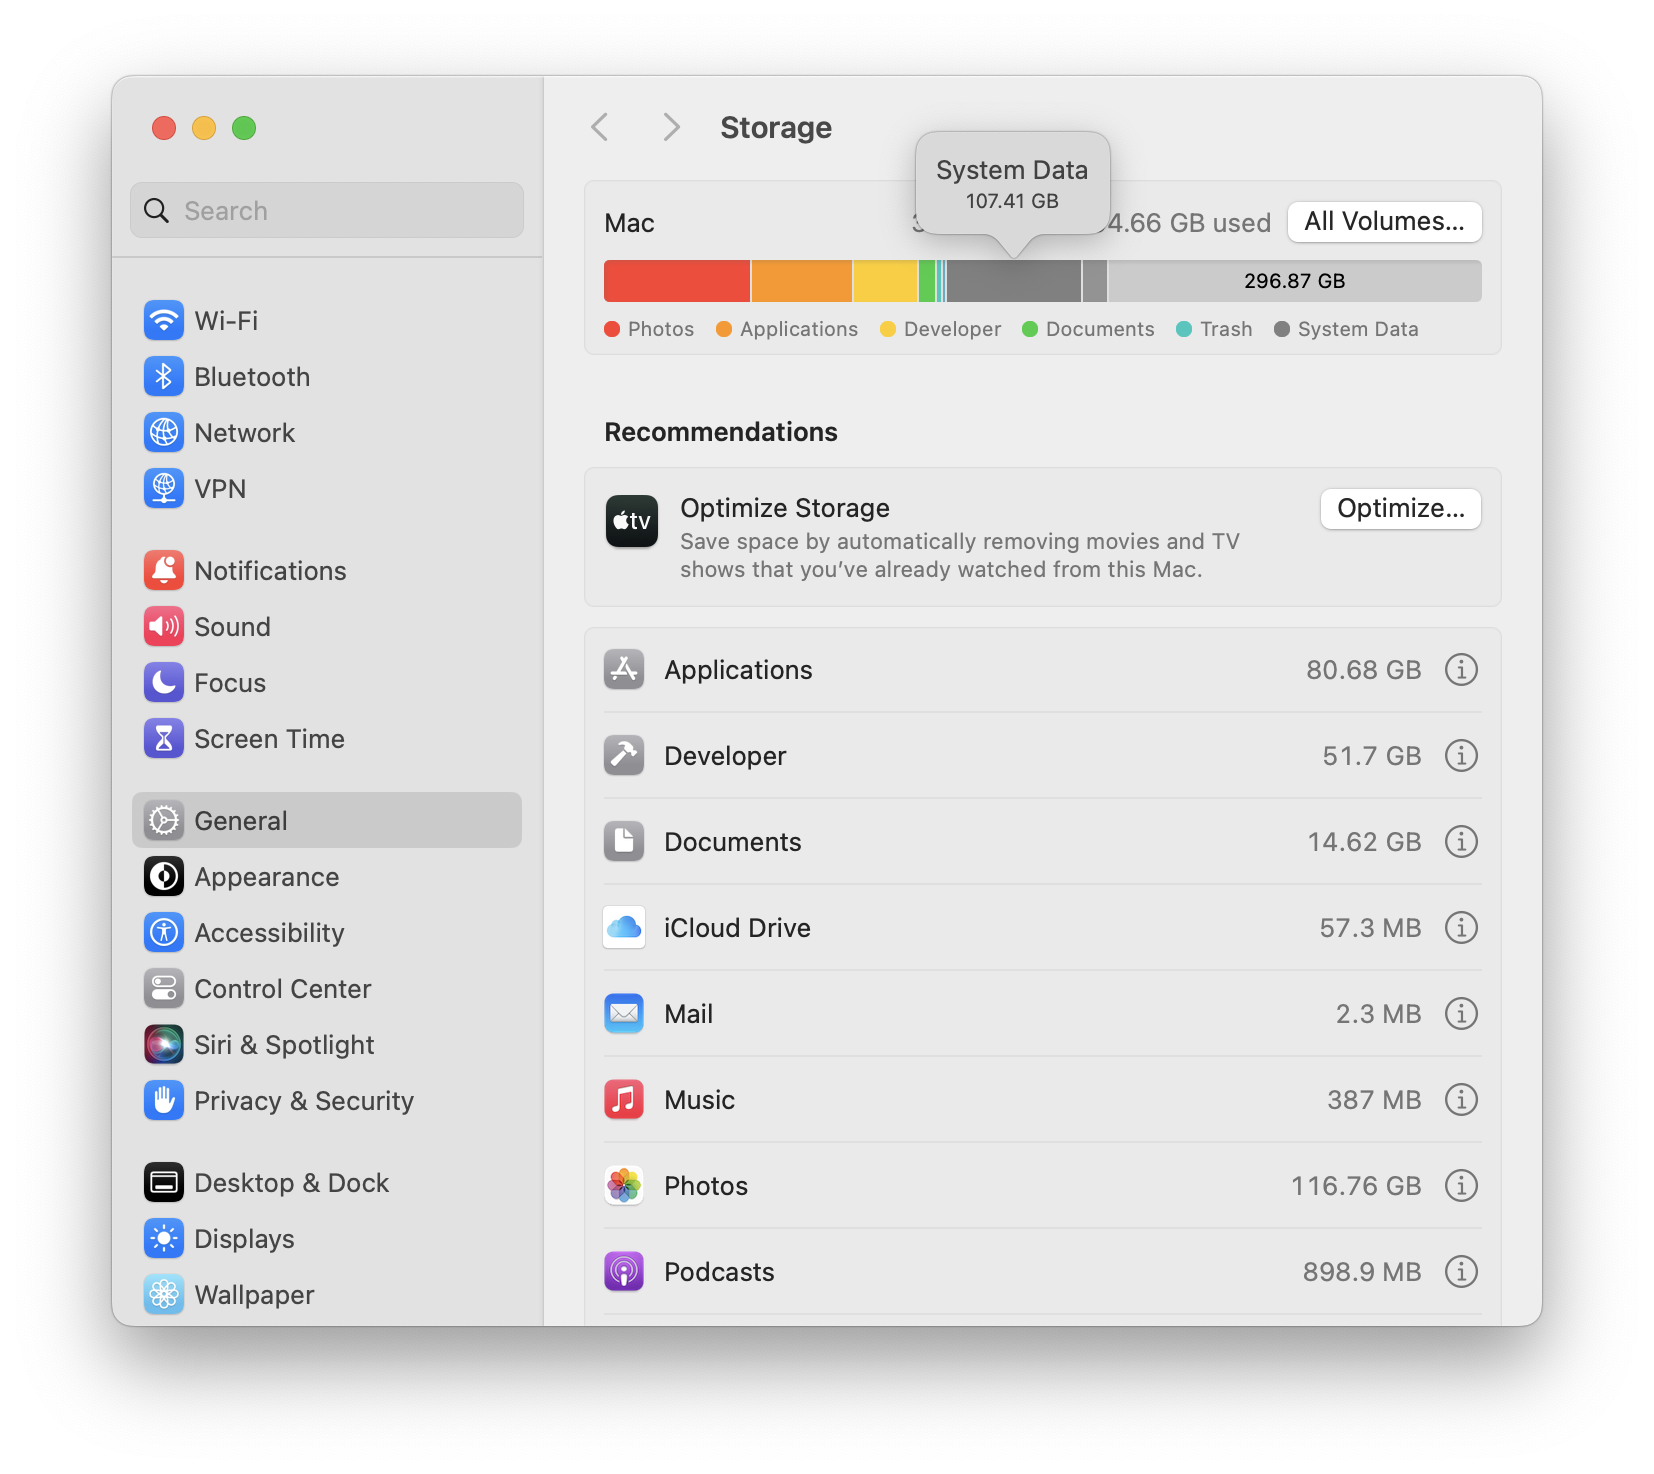 My storage. As you see, there’s a lot of system data
I do use the possibilities of the native Settings app, but in practice, it rarely helps. There are other tools that allow more granular control, one of them is DaisyDisk. I use it to locate the heaviest folders and occasionally delete them if I’m sure it’s safe. The app is not free, but it’s a one-time purchase.
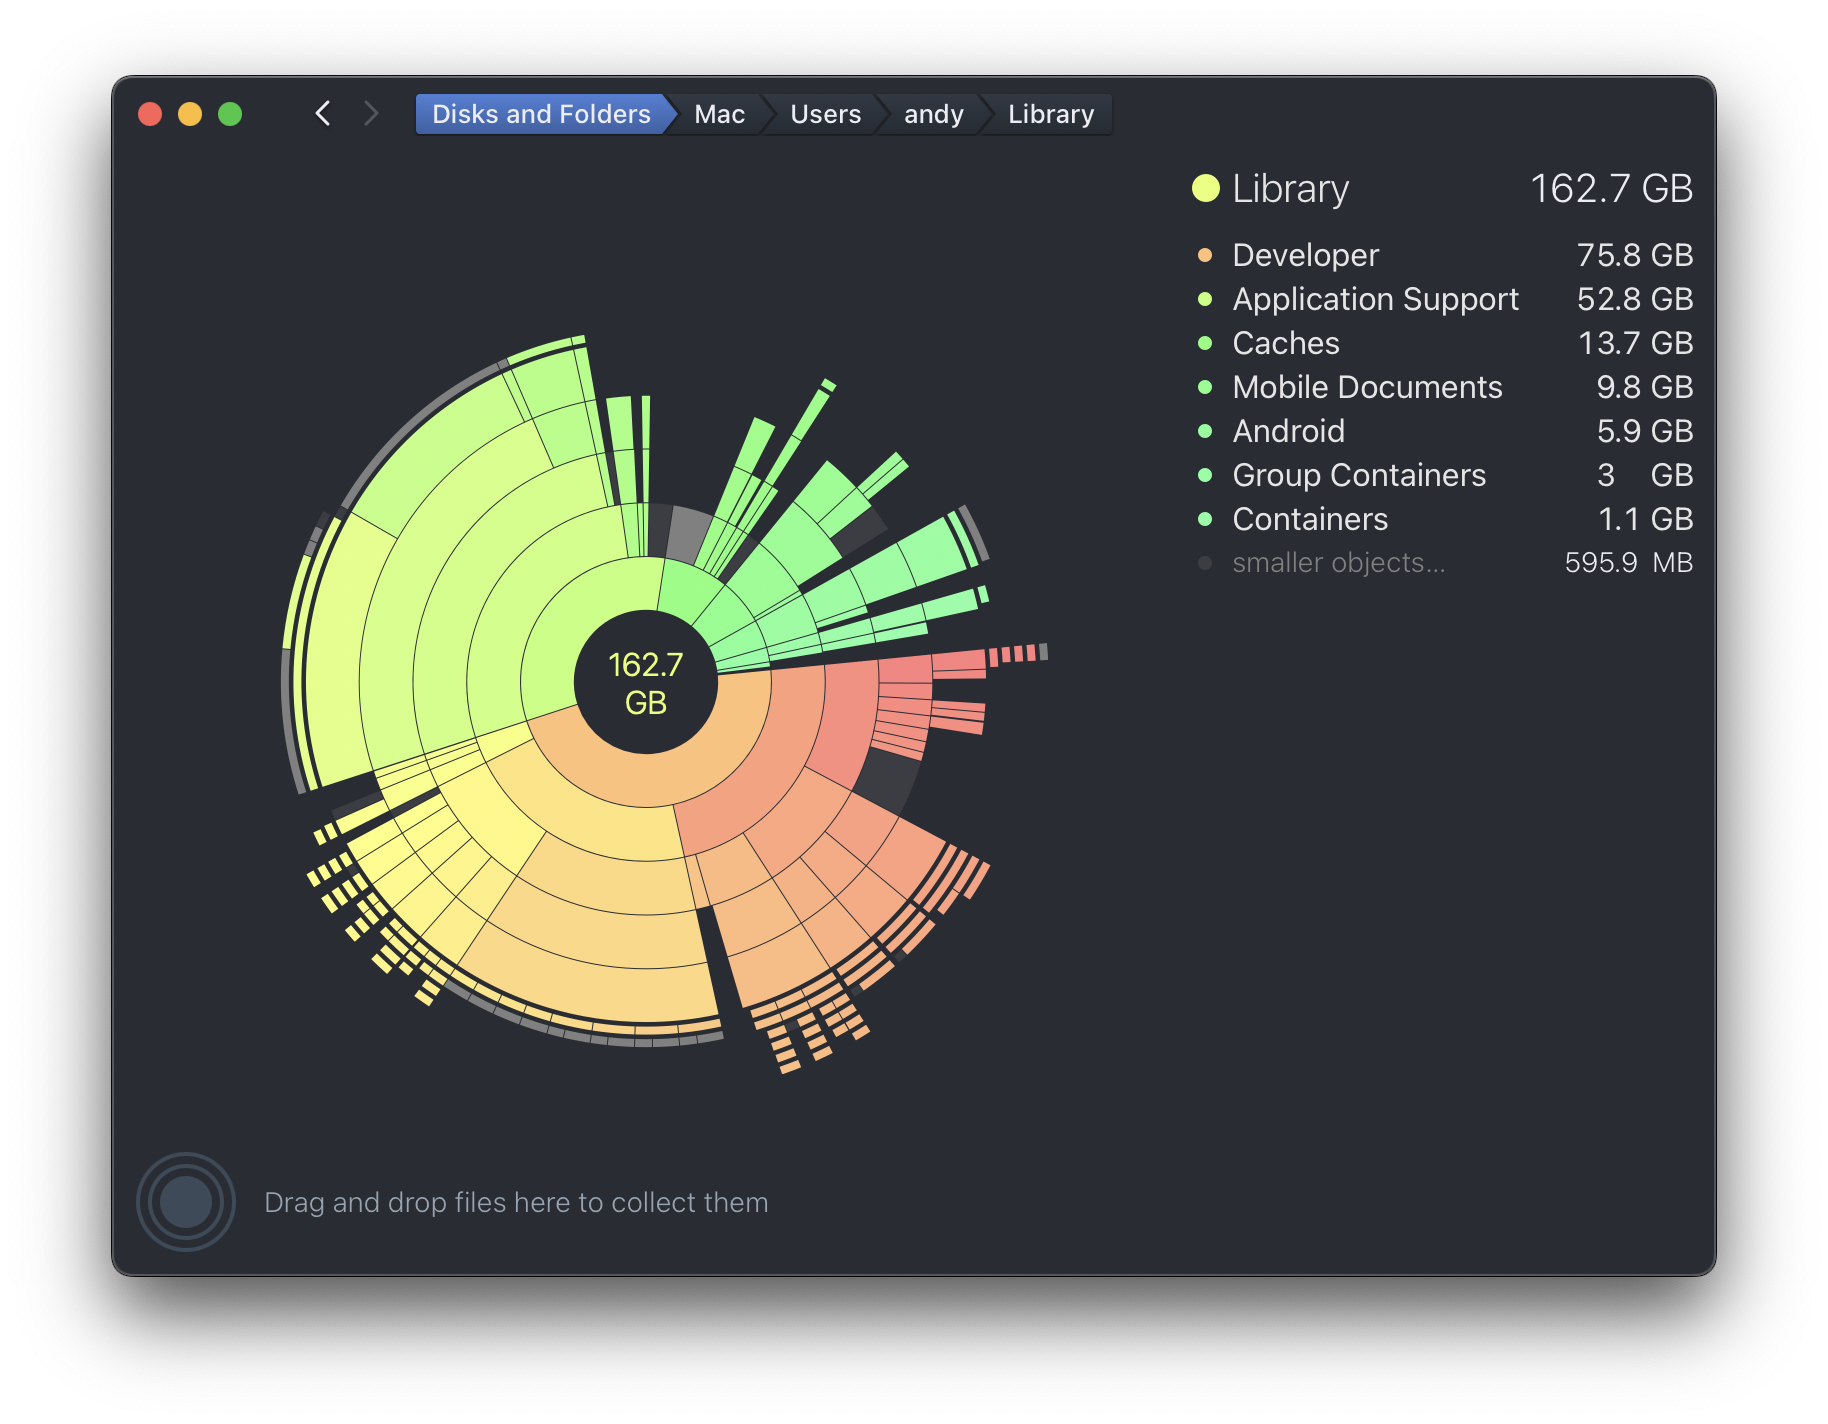 DaisyDisk comes in! You can already see that System Data mostly consists of caches
I also use DevCleaner which is a free tool for iOS developers. You can use it to clean simulators (very handy!), derived data, old archives, docs, and logs.
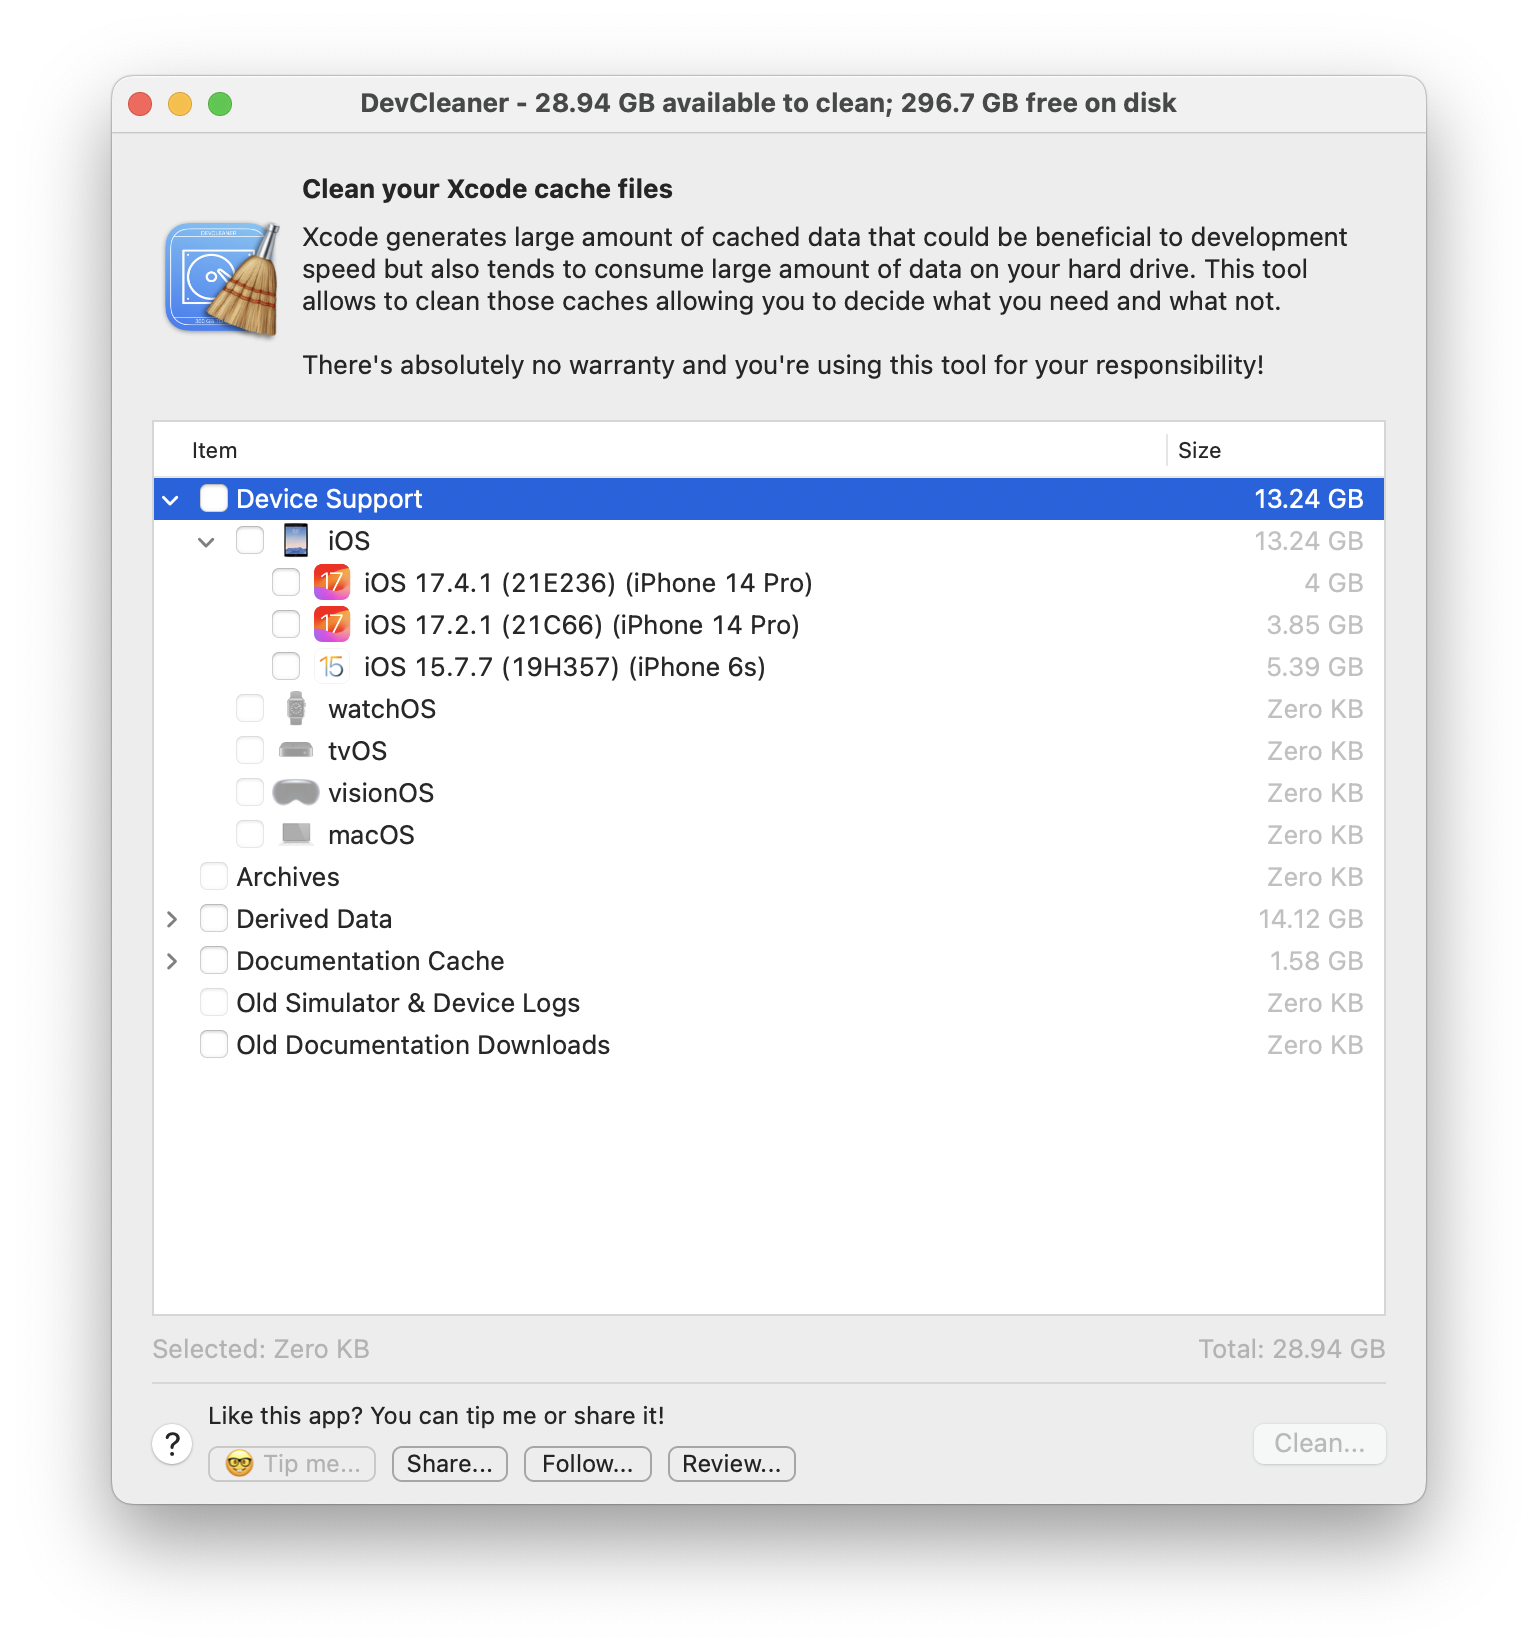 DevCleaner
Command Line
Command line is something that is overlooked by many people, including developers. In most scenarios, what you can do using the command line, like browsing your files, committing git changes, installing programs, and so on, can be done using a graphical interface. You should find out what’s more convenient for you.
But there’s also one thing I adore about the command line: it’s a unified interface for everything possible. You just write a command to make the app do something. You can combine these commands, redirecting the output of one command as the input for another. Add complex conditions, and that’s how scripts are born. And so much more. I urge you to read more about the Unix philosophy, it’s about exactly the same: make some simple blocks (commands in our case) and allow them to work together.
So yes, the command line, although a little old-fashioned, is simple and predictable. You find a new program, you check its commands with program --help or read its manual with man program and it’s enough to get started. One can argue if it’s really simpler than the graphical interface, but I can say that I sometimes find it harder to navigate to the right button than to type in the right command, especially with custom aliases for the most common use cases (more about it below).
Basics
First of all, you don’t have to repeat every command every time. Use ⌃ + R (Control + R) to search in your command history.
If you need to repeat a command that you’ve just typed (you may need it when you need to rerun something as the superuser), type !!, as in sudo !!. If you need to repeat the last argument from the previous command, use !$, as in cd !$.
Learn some shortcuts to navigate to the beginning or end of the line and to jump between words. I personally prefer vi mode, which I enable with a plugin. See more about Vim below.
iTerm
I use iTerm almost for historical reasons. Probably the features that made me switch from the default Terminal app are full 24-bit and 256-color mode and more advanced abilities to split panes. I just advise checking their website to see if there are any features you would miss in the default app.
 iTerm
iTerm
Appearance
As you might have noticed, I have a custom theme that I like a lot. It’s called Powerlevel10k. It beautifully shortens the text for the current working directory and highlights the current git branch. It has other awesome features which you might like, check them out. Many of them can be configured with an extremely convenient configuration wizard that launches after installation.
Plugins
Appearance is not the only thing you can customize. There are many plugins that your command line can be set up with, and some of them can be extremely useful.
My personal favorite is Oh My Zsh. It’s not just a single extension, but rather a framework for easier management of a multitude of plugins and configurations. Simply put: it makes life much easier! I tried configuring my plugins manually but eventually decided to stick with Oh My Zsh. My theme, which I mentioned previously, is installed with it, as well as the plugins that I would like to mention:
| Plugin | Description |
|---|---|
| git | Enhances Zsh with git-related aliases and functions |
| colored-man-pages | Adds colors to man page output for better readability |
| alias-finder | Helps find and manage aliases |
| aliases | Simplifies alias creation and usage |
| vi-mode | Enables vi key bindings in Zsh |
| autojump | Quickly navigates to frequently used directories |
| pj | Manages project directories |
| fzf | Integrates the fuzzy finder tool fzf for command-line operations |
Here is an extensive list of all plugins that Oh My Zsh supports. Some of them are just aliases, while others, like vi-mode or fzf, integrate into your shell. Try them out!
Aliases
Find what you do repeatedly. Make an alias! If you’re just starting, I suggest that you get around in the command line for a while and then run this command:
1
history | awk '{CMD[$2]++; count++;} END { for (a in CMD) printf "%d\t%d%%\t%s\n", CMD[a], CMD[a]/count*100, a;}' | sort -nr | head -n 10
It’ll print your most used commands. Here are mine on my personal machine:
1
2
3
4
5
6
7
8
9
10
248	16%	gst
132	8%	ll
110	7%	cd
108	7%	git
81	5%	gaa
71	4%	xed
61	4%	gcmsg
43	2%	..
41	2%	bundle
39	2%	code
It shows that my most used command is gst, which is an alias for git status. ll is also an alias for ls -lh, which nicely prints the content of the current directory with some useful information. Imagine how much time these aliases have saved me!
Sometimes, especially when an alias is not your own, it may be hard to remember. That’s why I use the alias-finder plugin that mildly reminds me of the existing aliases that shorten the command I have just entered.
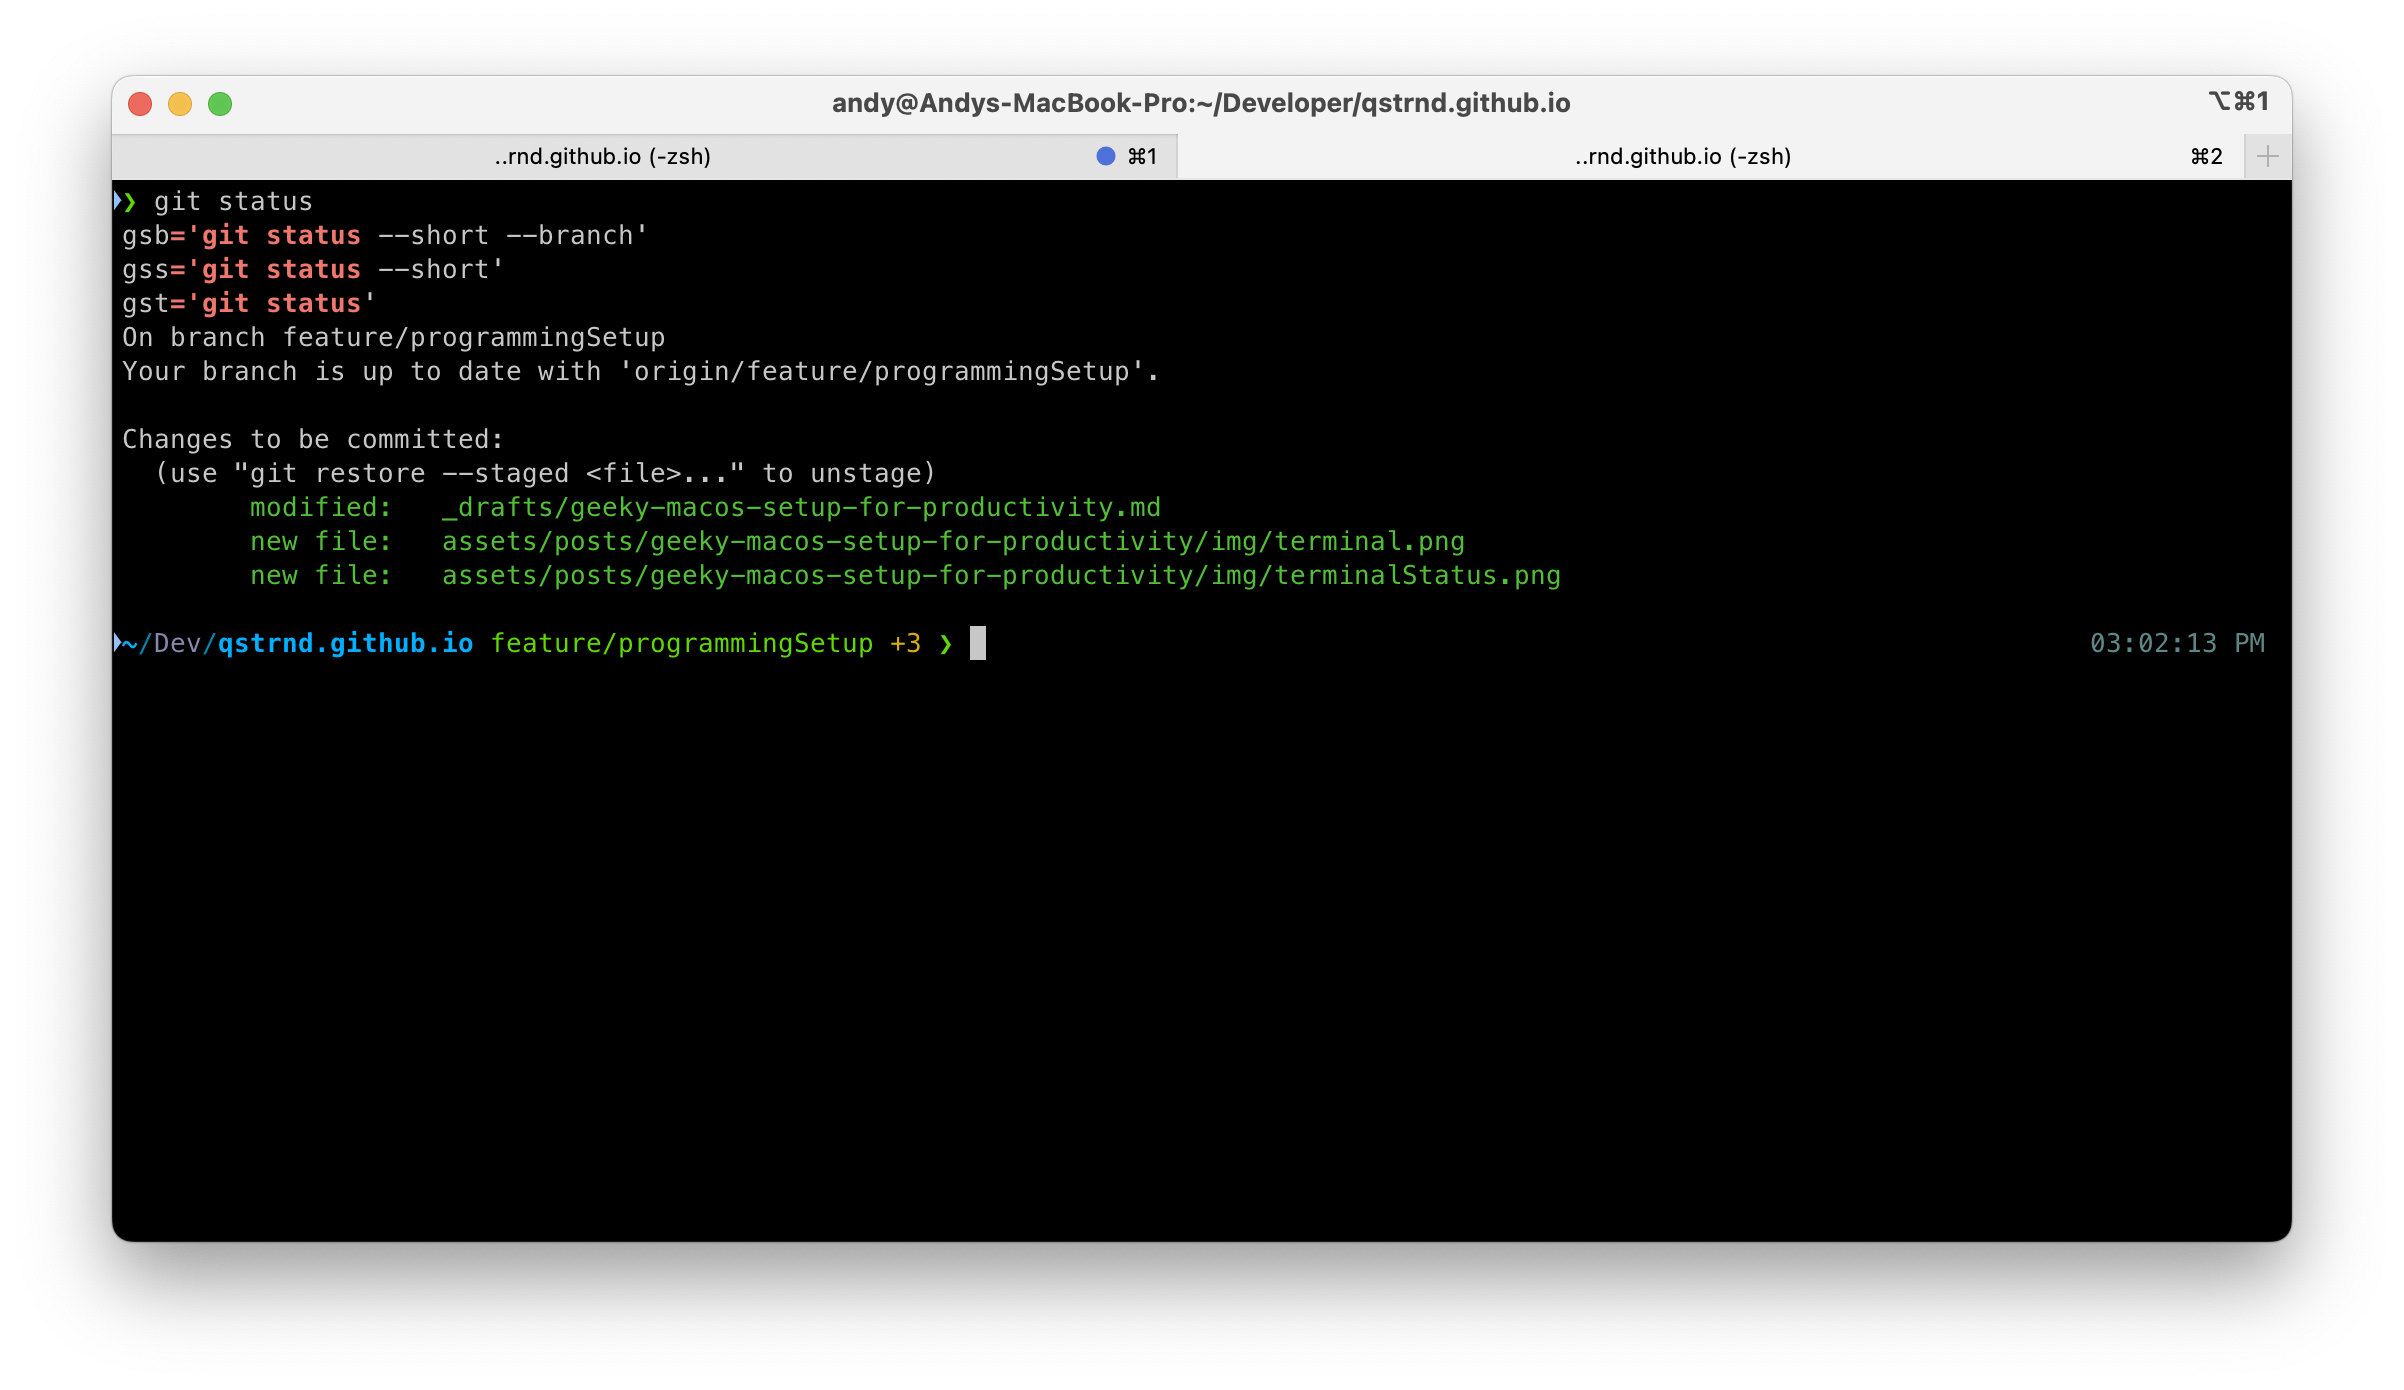 I’ve typed git status and got a hint at my gst alias
Scripts
Customize your shell’s configuration file! Not only aliases can be added to it, but also some custom logic. When you need to do something before your shell session is started, you put it in your shell config file. For Zsh, it would be .zshrc in your home directory. What I provide below is just a random example of some repetitive tasks that can be managed this way.
If you’ve ever worked with ssh, you probably encountered the need to start the ssh agent in the background. That can be done with the following command in your config file:
1
2
# Add ssh-agent for
eval "$(ssh-agent -s)" > /dev/null 2>&1
Another recent example: I found myself constantly cding to the ~/Developer folder almost every time I opened iTerm. I already had the alias cdd for it, but I decided to go further and write this little script:
1
2
3
4
5
6
# open Developer directory instead of HOME if it exists on current machine
if [ "$PWD" = "$HOME" ]; then
  if [ -d "$HOME/Developer" ]; then
    cd "$HOME/Developer"
  fi
fi
So every time I open the terminal, I am in my favorite folder as my working directory! I added some conditions because sometimes, when I open the shell from VS Code, for example, and it opens the directory of the project I’m working on, I don’t want to navigate to the Developer folder.
Git
I’d like to mention my git config separately since it’s my primary activity in the terminal. I mentioned the git plugin for aliases that I use, the most common being aliases for git status, git commit --message, git push, git pull, and git checkout.
There are also more complex functions that are defined in my gitconfig under [alias] and have been there for ages. Check this one:
1
 bclean = "!f() { DEFAULT=$(git default); git branch --merged ${1-$DEFAULT} | grep -v \" ${1-$DEFAULT}$\" | xargs git branch -d; }; f"
So every time I type git bclean, it deletes all branches that have been merged into the specified branch (or the default branch if none is specified), except for the currently checked-out branch.
Another one that I often use:
1
bdone = "!f() { DEFAULT=$(git default); git checkout ${1-$DEFAULT} && git up && git bclean ${1-$DEFAULT}; }; f"
It does what bclean does plus checks out to the default branch which is often main, master, or develop.
I also like this one to pile up work in progress and quickly commit it:
1
save = !git add -A && git commit -m "SAVEPOINT"
And this one to correctly sync my submodules:
1
submod = "!f() { git submodule deinit -f . && git submodule update --init  && git submodule foreach --recursive git reset --hard  > /dev/null; }; f"
I mentioned above that I also see my current branch right in the terminal, which helps me a lot. I have stats like how far my local branch is ahead or behind the respective origin branch. I also heavily use autocompletion that comes with Oh My Zsh: it helps me find the appropriate branch name, tag, or even commit hash.
If you’re a new developer, I highly recommend you read about Gitflow and use it extensively. Have some personal projects for learning after reading an article? Do not just write them and throw them away! Make a single repository, make feature branches for separate learning projects, commit your work as you progress, and merge it when it’s ready. I honestly wish I’d started doing it earlier since I’ve lost some pieces of code that I nostalgically (and sometimes practically!) miss. By having such a repository for your learning projects, you can keep track of how you learn and progress, which is important and even encouraging for the next achievements.
Dotfiles Repo
So many configs already. So many files to put them in. It may be hard to move to a new laptop and manually copy all your configurations. That’s why some people use a separate git repository for their dotfiles, and I’m among them (here’s mine, originally forked from Holman’s).
Basically, it’s just a repo for config files (or as many people would refer to them, dotfiles, since they usually start with a dot to make them hidden by default, which is a common pattern for configuration files).
This particular dotfiles repo has some scripting magic, like this:
Anything with an extension of .zsh will get automatically included into your shell. Anything with an extension of .symlink will get symlinked without extension into $HOME when you run script/bootstrap.
A symlink (short for symbolic link) is just a reference in your file directory to another file. It’s very handy to link the actual config file with its expected place in the system, as in the example:
1
ln -s dotfiles/actualGitconfig ~/.gitconfig
I urge you to commit your dotfiles so that you never miss your configs on another machine!
More
Many principles that I follow in my approach to dealing with the command line were brought or solidified by the course called The Missing Semester of Your CS Education. It focuses on practical lessons, like how to work in the command line, what the most used command-line programs are, how to write scripts and automate repetitive tasks with them, and more. Check it out!
Code Editor
If you’re a developer, you know that the code editor is the app you can spend a lot of time with. That’s why it’s crucial to know it well and be adept at using it.
I recommend you examine the documentation, learn what features your IDE or code editor of preference provides, how it can be extended, and keep an eye on the updates. For example, here’s a recent WWDC session Xcode Essentials for fellow iOS/macOS devs. It can be used as a nice introduction (but read the docs nevertheless).
I would recommend you start with the following:
- Find out if there is a prompt to quickly open commands (I already mentioned it, but it’s worth repeating: Command Palette in VS Code, or Quick Actions in Xcode).
- Learn what you generally need to do: navigate between files, open multiple editors, view who’s to blame for this line of code, etc.
- If you’re already familiar with another editor, you can use tricks to accustom yourself quicker to the new one by setting the same shortcuts. For example, this VS Code extension can be convenient for Xcode users.
- Find how to do the same quicker by memorizing new shortcuts and ways to work with the app.
I will highlight only a few features that I expect to find in a modern editor.
Guidance
A good editor should help you code, so it needs to have features like code completion, quick symbol navigation, integrated documentation, and even an AI-based copilot. That is, everything to help you code with the minimal possible effort from you.
Refactoring Tools
Once the code is written, it may be time to refactor it. Symbol renaming, code extraction, method signature correction, and so on.
VIM Mode
I once got to know the VIM way of working with text and it changed me a lot. Here you can find extensive documentation on the VIM editor and I’ll tell you only about some of the features I use the most.
I rarely use VI or VIM on their own; I prefer VS Code and Xcode with all their enhancements like the navigation tree, tabs, multicursor modes, and more (though you can infinitely extend the basic VIM with plugins). But I do enable VIM commands.
But let’s talk for a while what’s so special about VIM. First of all, VIM introduces modes to your editing: Normal mode for navigation inside text, Insert mode for editing, Visual mode for selection. Secondly, its keys are designed in a way to be as convenient for you to type at speed as possible. That’s why hjkl are used for moving the cursor (chances are, if you’re proficient at touch typing, your index finger rests at j). Thirdly, you can observe some patterns that make memorization easier: some keys are easily remembered with mnemonics (like d for delete or p for paste); some commands can be combined, as you can do with operators (like delete) and motion keys, resulting in commands like d3w which can be read as delete 3 words after cursor.
Here is the list of some of the commands that I use most often:
| Key | Description |
|---|---|
| Navigation in Normal Mode | |
j and k | Move cursor down and up respectively |
Control + D / U | Scroll down and up respectively |
h and l | Move cursor left and right respectively |
^ | Move to the first non-blank character of the line |
$ | Move to the last character of the line |
w and b | Move to the beginning of the next or previous word respectively |
f and F and any key | Move to the next or previous occurrence respectively of the given key |
; | Repeat f / F command (move to the next occurrence) |
gg or G | Go to the very top or bottom of the file |
zz | Center the current line of text in the window |
/ | Invoke search |
| Editing in Normal Mode | |
i and a | Switch to Insert mode before and after the current character respectively |
I and A | Switch to Insert mode at the beginning or end of current line respectively |
d | Delete what you specify after d. My favorite is di) which deletes the content inside parentheses (the surrounding characters can be different) |
c | Change what you specify after c. You can do the same magic as with d |
r | Replace the character under cursor |
~ | Toggle case for the character under cursor |
dd | Remove the line completely |
D | Remove the contents from your cursor to the end of the line |
C | Change the contents from your cursor to the end of the line (it means delete and switch to Insert mode) |
. | Repeat the last command |
o and O | Enter editing mode with the new line below or above your current line respectively |
yy | Copy (or yank) the whole line |
p or P | Paste the contents after or before the cursor (or current line if the whole line is in the buffer) |
These are just a few examples. There are also interesting commands for Visual mode, features like macros, registers, split views, search and replace, and more.
Besides the comprehensive documentation, I recommend you keep at hand the VIM cheat sheet. Also note it’s completely okay to feel frustrated the first time; that’s why I recommend learning VIM step by step in your current IDE or code editor and seeing what saves your time indeed.
If you use VIM heavily, you may consider remapping Caps Lock to Esc. You can easily do it in Settings.
Multiple Cursors
Multiple cursors are a must-have. Sometimes I miss it in document editors. It allows you to solve repeated problems in many lines simultaneously.
Split Views
The ability to open different editing windows side by side is a must-have as well.
Useful Side Info
I expect the editor to not only show me line numbers but also highlight which part of the code is to be committed, who is the author of this line and in which commit it was created, what definitions this file has, and so on. That’s why I enable features like a Mini-app and memorize shortcuts like ⌃ + 6 (Control + 6) in Xcode (which allows searching through document items inside the file).
Debug Tools
Debug tools can be varied and complex. As an Xcode user, I explored the LLDB (LLVM Debugger) commands, breakpoints of different kinds, View Debugger for UI and Memory Graph for memory leak detection, Xcode Instruments for performance profiling, and more. Make sure you’re at least familiar with the debug tools that are integrated into your IDE.
Extensions
Extensions or plugins are cool. I wish there were more extensions for Xcode. And I use them a lot in VS Code. I think the prime reason why people use VS Code for everything is because it’s extremely customizable with different kinds of extensions for every imaginable tech stack. Take a look at what’s popular for your stack and try it out. My favorite is VIM mode, of course.
Browser
A browser is a special app that not only allows you to access the web, but with web applications, it becomes somewhat like an operating system in its own right, so that many people prefer using web apps to their native counterparts. I personally use Firefox for my home environment and Chrome for my work environment. I gave up on using Safari due to its lack of many extensions (though there are some really nice ones!). I won’t compare different browsers here, but I can say that I value Firefox for being pretty lightweight, highly customizable, and focused on privacy.
Privacy
I’m not very ideological, but I like to be cautious with what I share. If you want to learn more, check this public Privacy Guide. This website also contains some info about particular apps, as well as some tricks and techniques, and I found some of the recommendations useful.
Besides choosing Firefox as my default browser, at some point I decided to use DuckDuckGo as my default search engine. It worked surprisingly well compared to others and currently covers my needs.
I use uBlock Origin, an extension that blocks not only ads but also ad trackers. And as a second protection level, I utilize Ghostery. Aside from a few websites that require you to allow ads, the experience of browsing the web is much better with these extensions. It also makes your browsing a little more private.
Security
Where there’s privacy, security should also follow suit. I won’t cover it deeply, but will rather mention some basics.
I set up my browser following a privacy guide, like this one for Firefox. I sync my data via Firefox servers, except for passwords. I decided to store passwords in a separate place intentionally, and use Bitwarden for it. I’ve installed both the extension and the app. I use the free version, and it’s enough to get all my devices synced, including my iPhone, where Bitwarden can be selected as the default password manager and will provide autofill ability wherever it’s supported.
For some services, including social and financial ones, I set up 2FA (two-factor authentication) through an OTP (one-time password), which I prefer over SMS. There are plenty of apps that allow you to set up an OTP, among them are Raivo and Google Authenticator.
Useful Extensions
There are other extensions that I like a lot and use daily. I’ll describe them a little below. The links will direct you either to the extension’s website, where you can find a version for your browser of choice, or to the respective Firefox Addons if I couldn’t find one.
| Extension | Description |
|---|---|
| Vimium | A keyboard shortcut extension for navigation and control in the browser. Nerdy but very cool! |
| Dark Reader | Turns on dark mode for websites to reduce eye strain |
| Highlight by Trix | Allows you to highlight text on web pages for reference or emphasis. I use ⌥ + H (Option + H) to trigger it |
| Bonjourr - Minimalist Startpage | A customizable, minimalist start page with weather and bookmarks (my favorite so far!) |
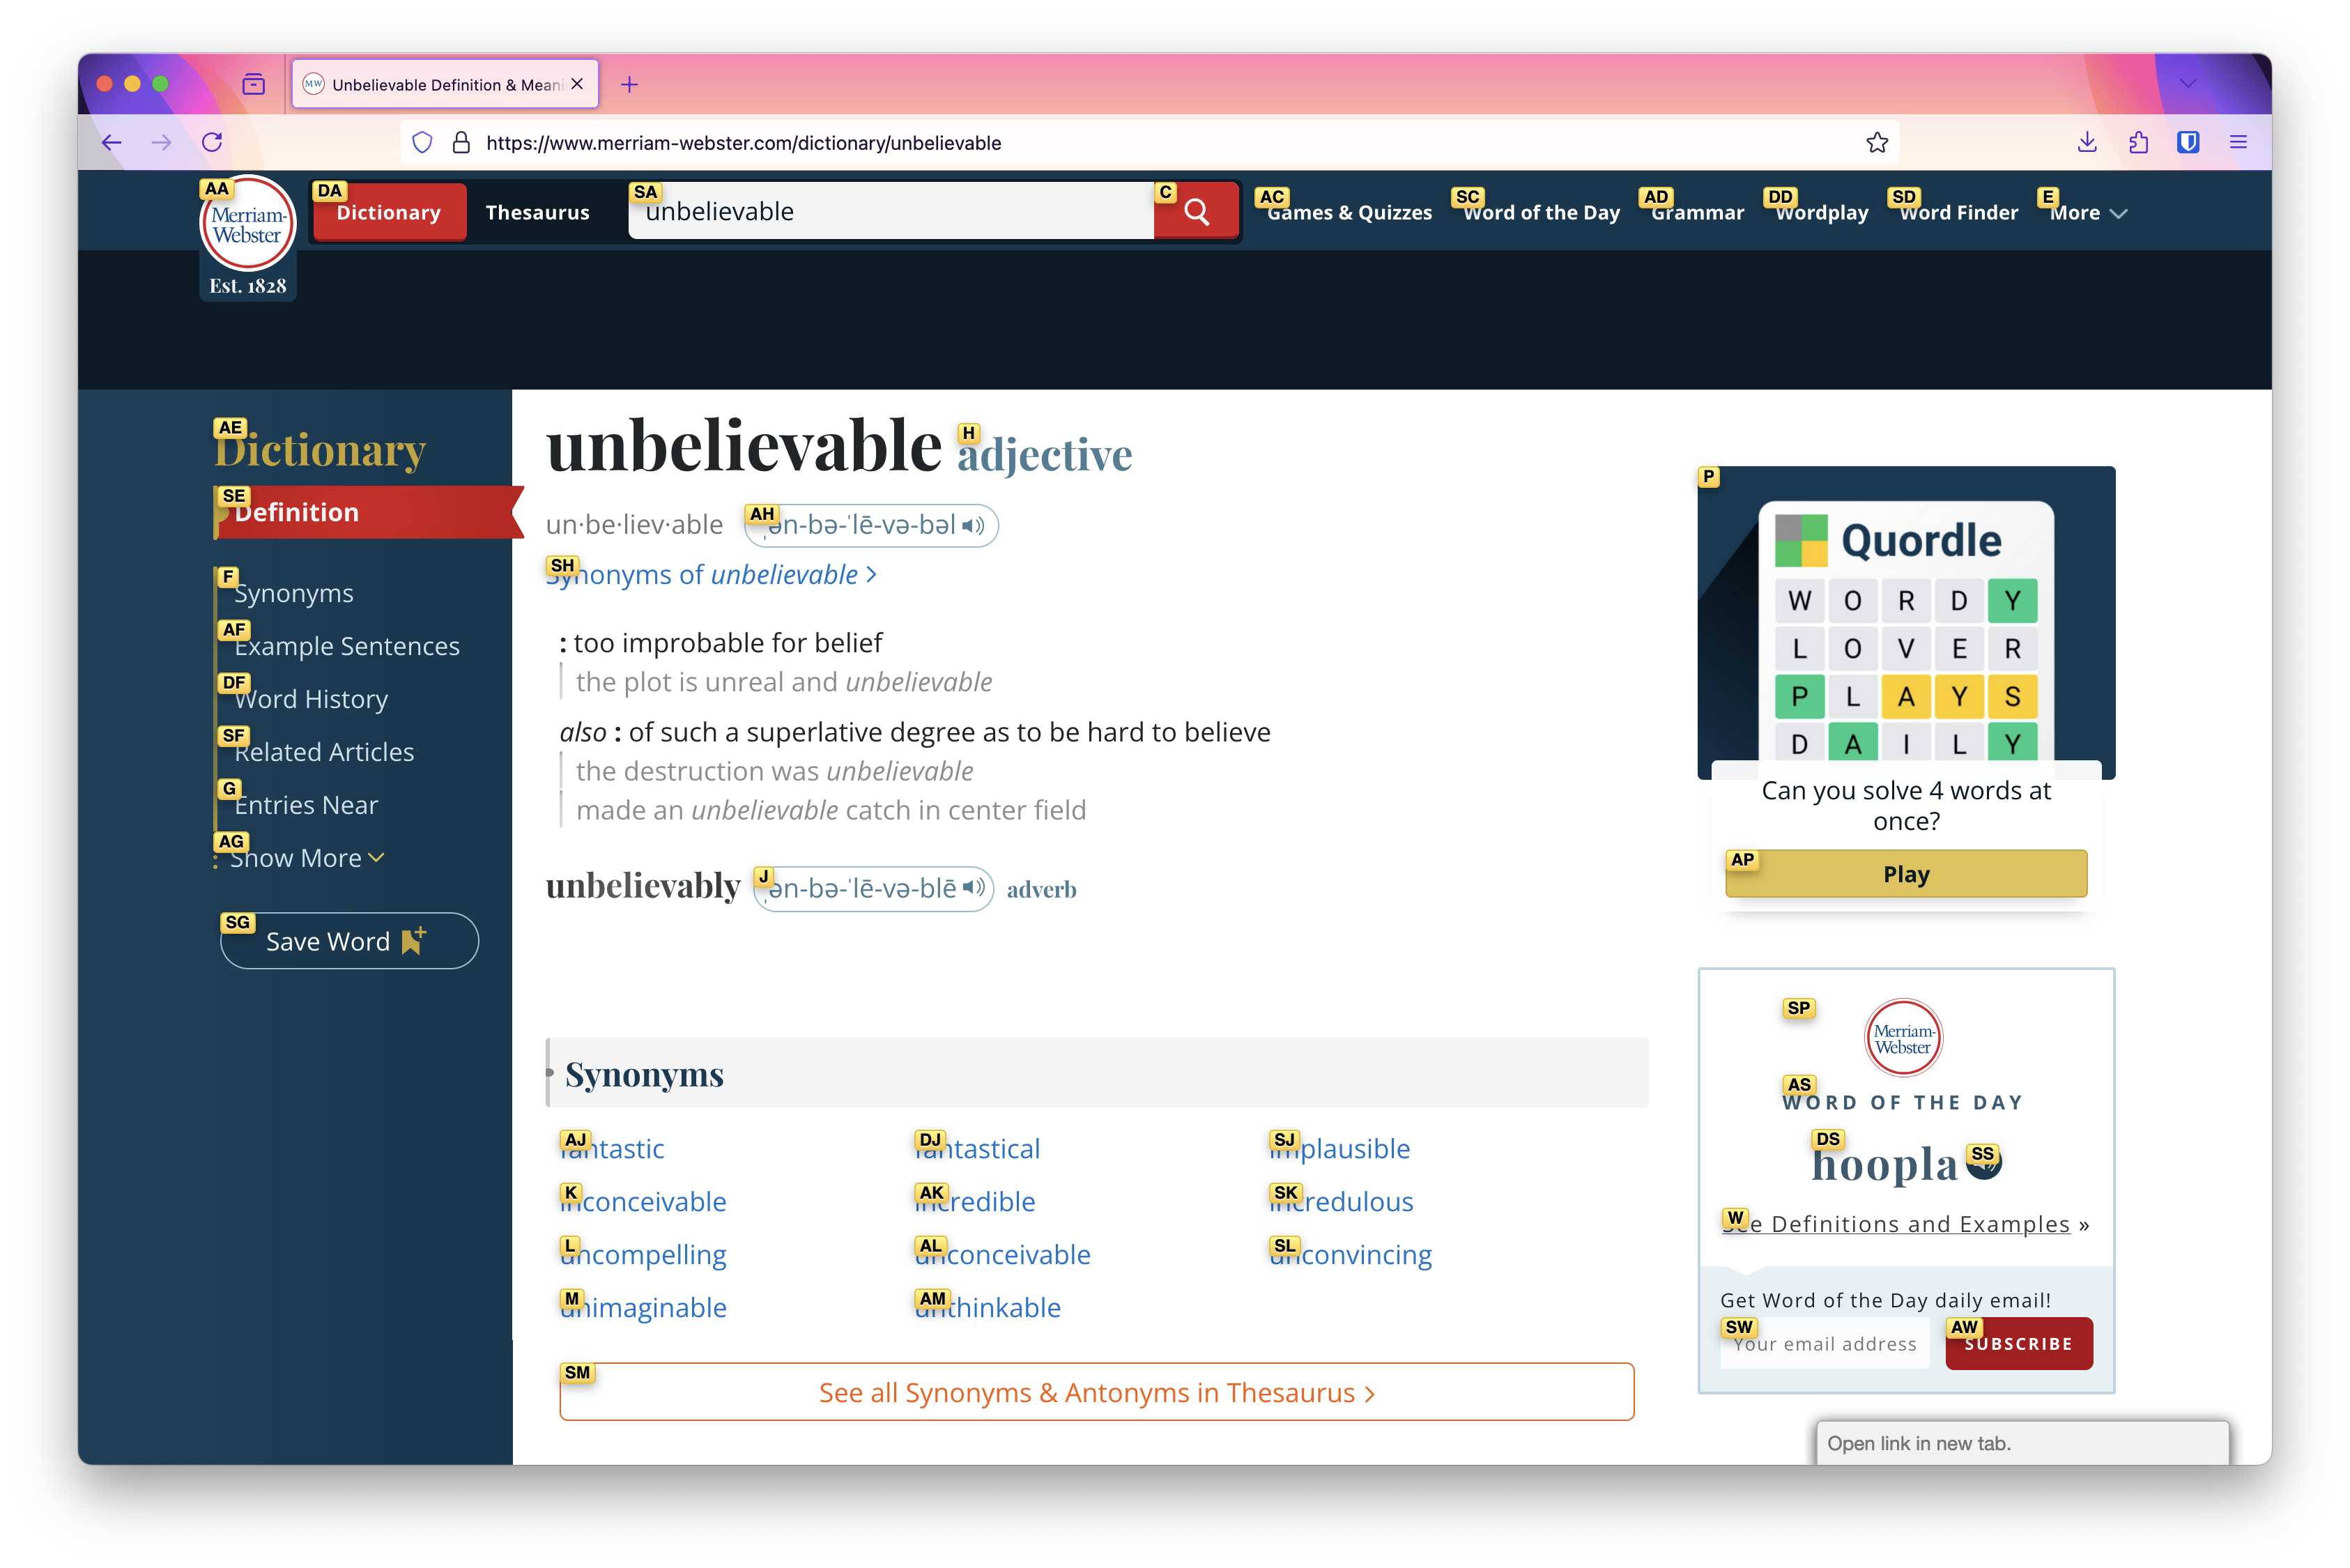
| DeepL Translate: Reading & Writing Translator | Provides translations for reading and writing in multiple languages. I use ⌥ + D (Option + D) to translate a selected piece of text |
| History AutoDelete | Automatically deletes your browsing history based on rules you set |
| Pin Unpin Tab | Quickly pin or unpin tabs in the browser. I use ⌥ + P (Option + P) to toggle it |
| Close Other Tabs Button | Adds a button to close all other tabs except the current one. I miss ⌥ + ⌘ + W (Option + Command + W) from Safari |
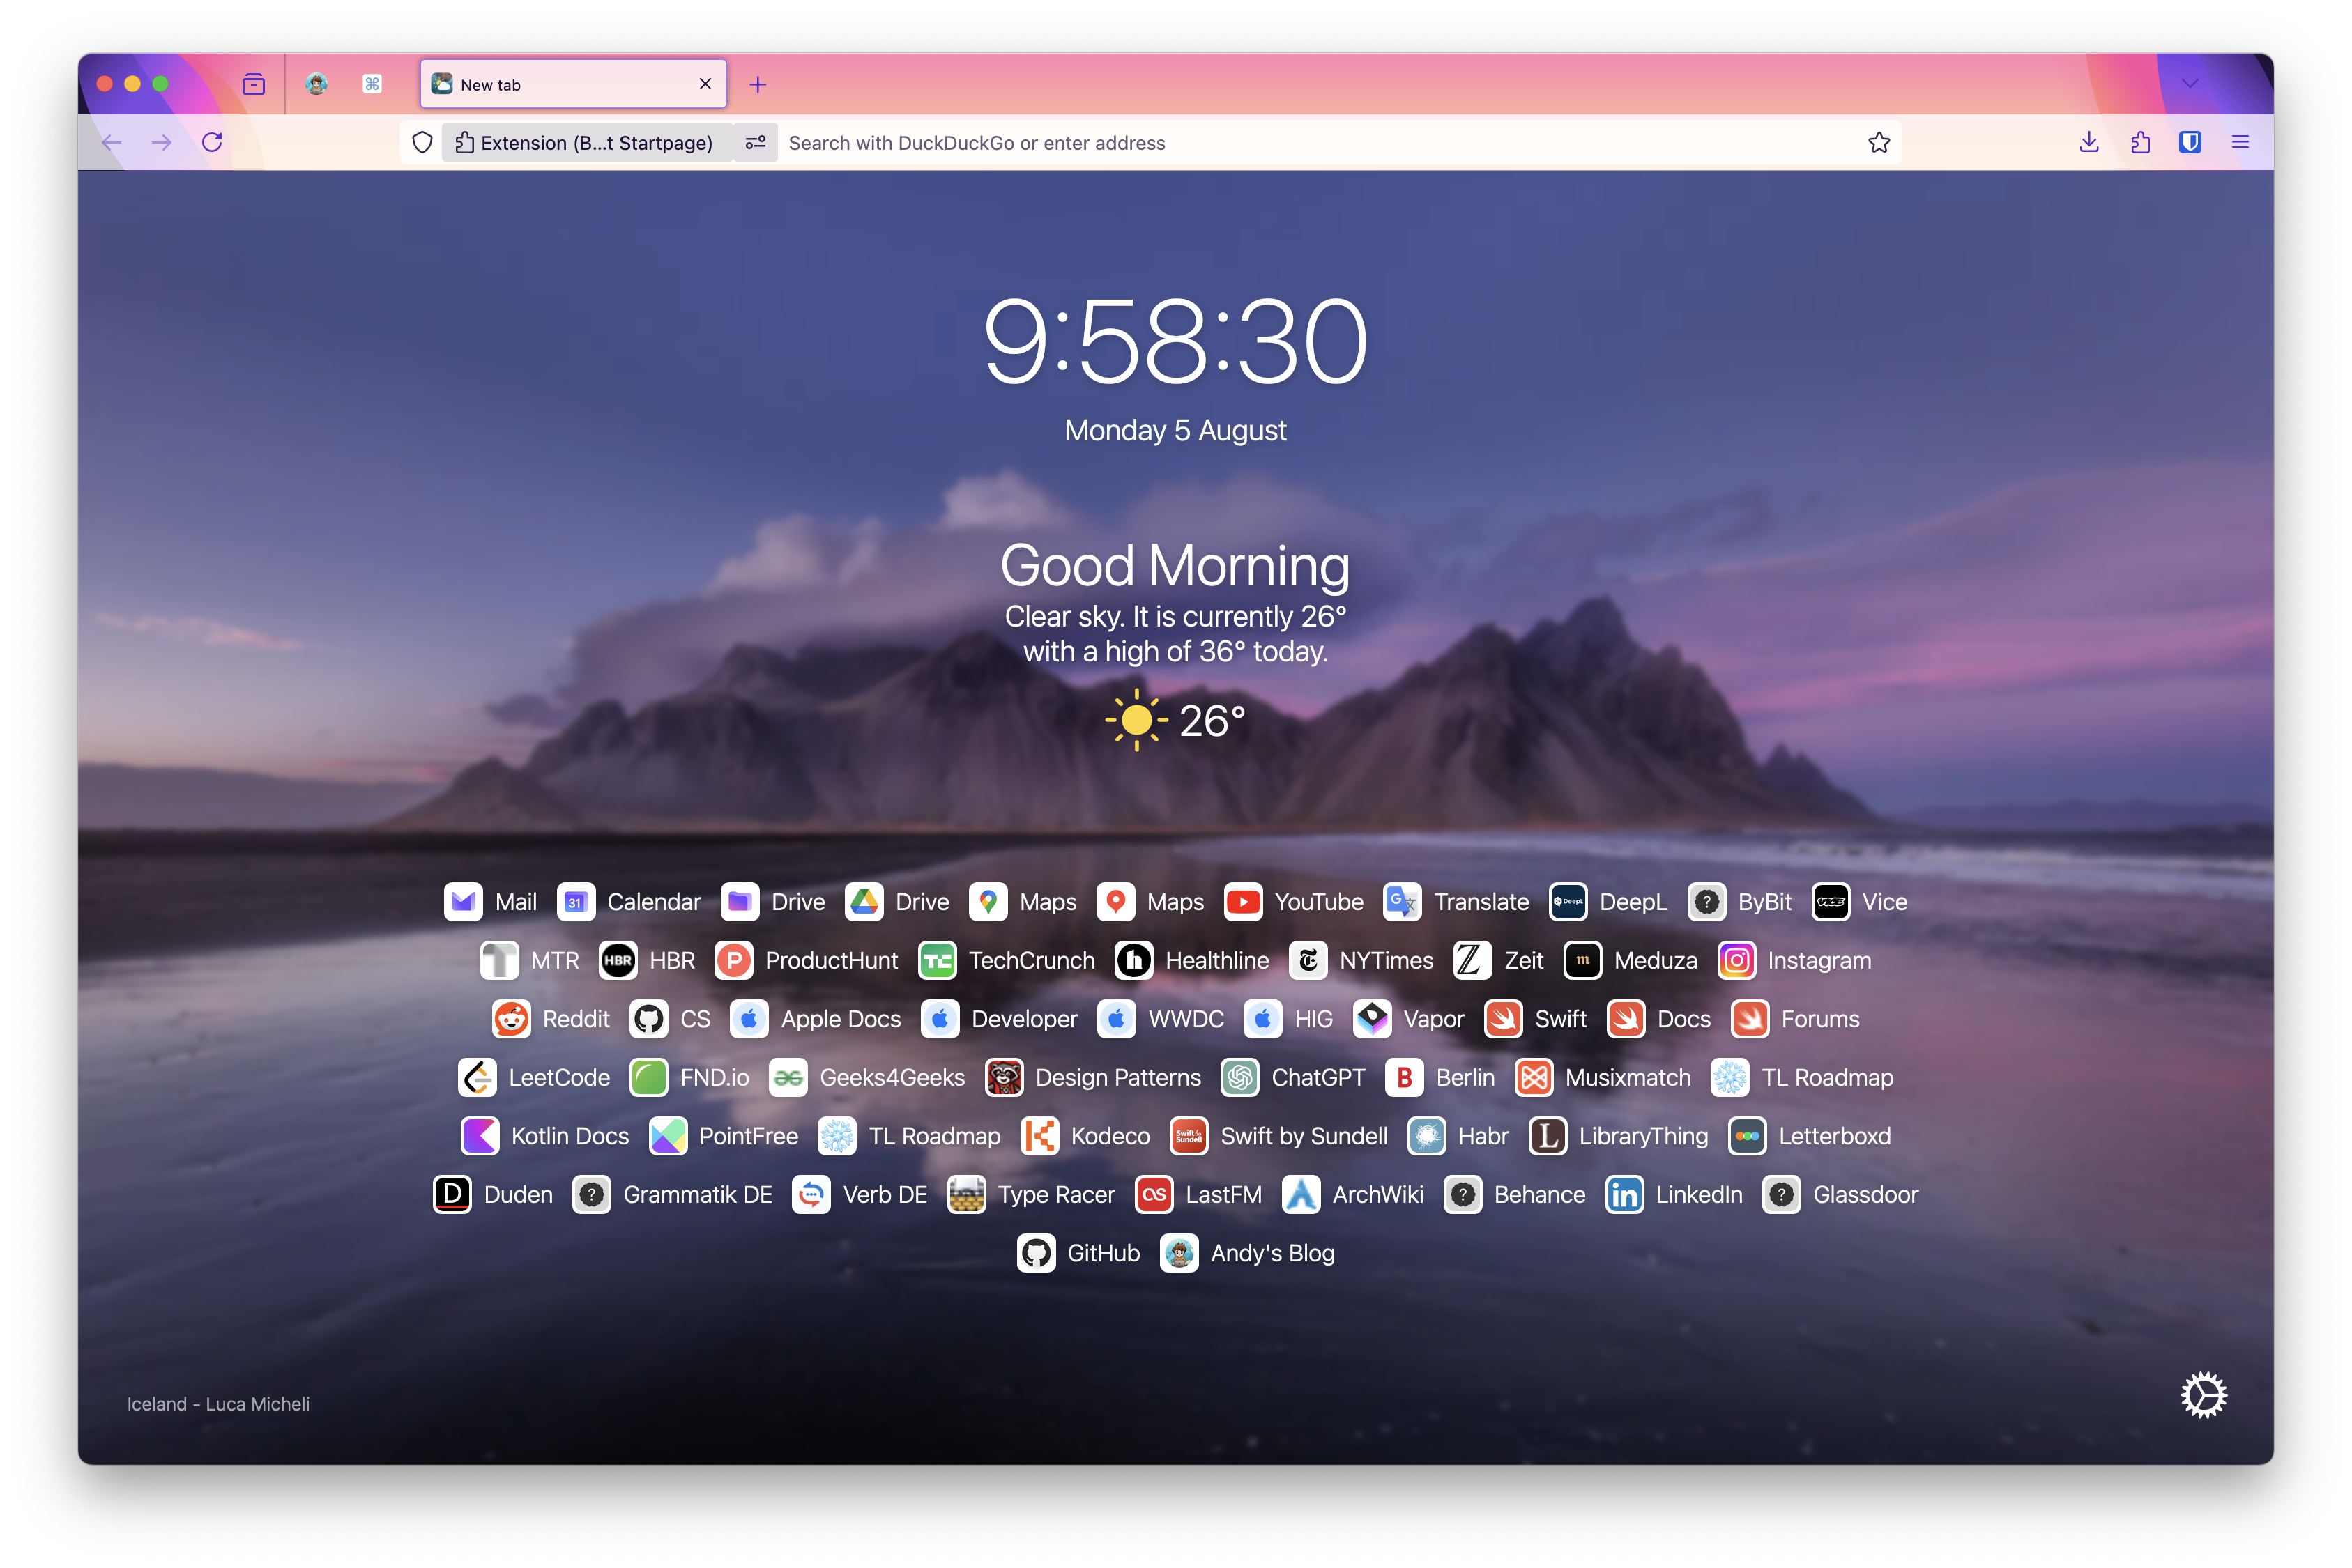 Bonjourr as my Startup Page
And in case you wonder what theme I use, it’s called Firefox Alpenglow.
Vimium
Yes, this Vim-like extension. I want to say more about it. It’s the reason why I highly reduced the usage of the trackpad. I use it to switch between tabs, navigate inside the page, open bookmarks, and so on. Below is a demo of one of its functions that highlights links on the webpage and allows you to navigate to the link by pressing the corresponding keys.
 Vimium extension mode after pressing f on a webpage
Miscellaneous
I would assume that you use macOS, so below there will be links to the macOS App Store if there is no separate website for the app.
Pomodoro Timer
I use the Pomodoro Technique at work and for personal activities. I work concentrated for 25 minutes, then take a pause for 5, then repeat four times, with the last time having a pause of 15 minutes instead. There are different applications, and I decided to stick with Raycast’s built-in Pomodoro. I also have a nice timer in the Menu Bar that comes with it.
Time Tracking
Sometimes I use Toggl to track how much time I devote to different projects and endeavors. It’s a nice cross-platform app, it supports features like Pomodoro and billing, so it’s worth giving a try.
Menu Bar
If you feel your Menu Bar is a little cluttered, you can explore the Bartender app. I don’t use it, but I once tried it and the idea itself was funny: to customize when and where you see the menu items in the upper-right corner of your screen. You can hide them, show different sets of them in different modes, customize spacing in between, and more.
Floating Notes
I use Notion as my note-taking app, but sometimes there’s the need to make and show notes in some lighter shape. That’s where Raycast’s built-in Floating Notes come in handy, which I invoke with - ⌃ + ⌘ + N (Control + Command + N). I use it for words that I jot down while watching a movie in a foreign language, some thoughts not to forget later, or even meeting notes when I share my screen and don’t want to accidentally show my other notes since they may be private. Here’s how it looks right now, for example:
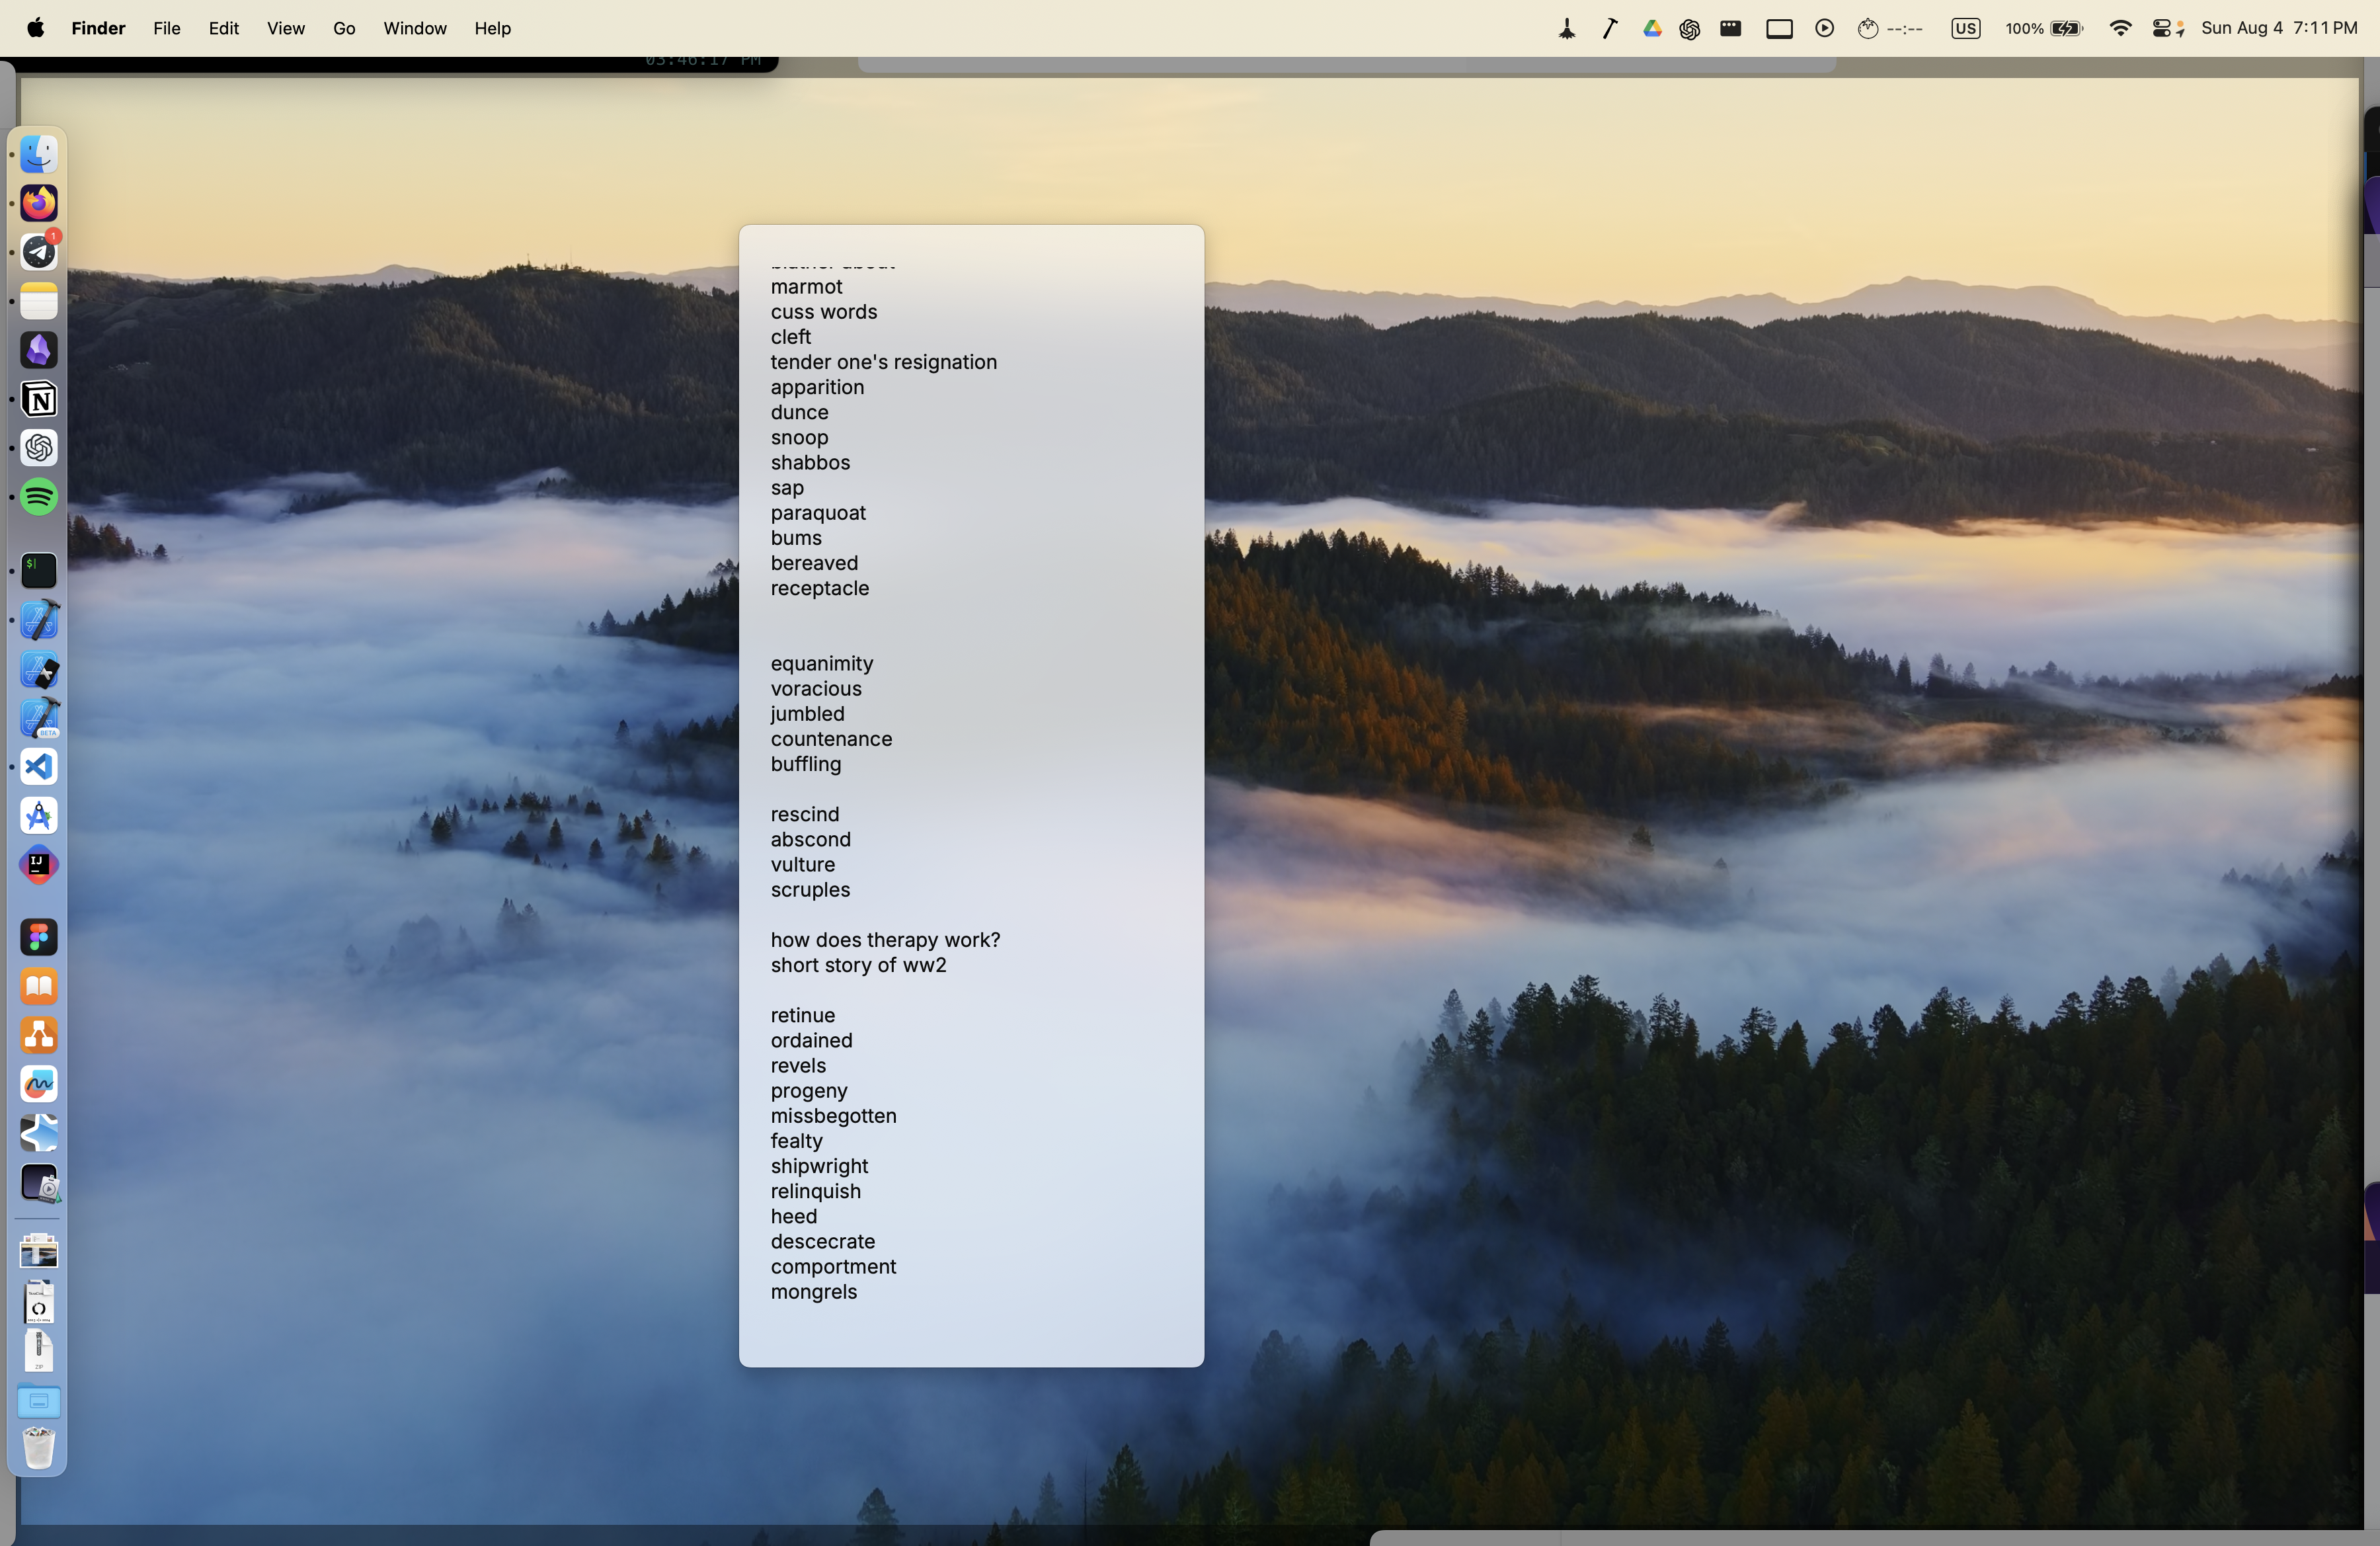 Floating Notes
Apple’s Quick Notes are good as well, but I don’t use them since they appeared after I learned about Floating Notes.
More Space
I do have to mention it! I think my Mac’s screen is big enough to fit more text and elements, so I go to the Display settings and enable higher resolution (under More Space). Here you can compare it and decide what’s better for you:
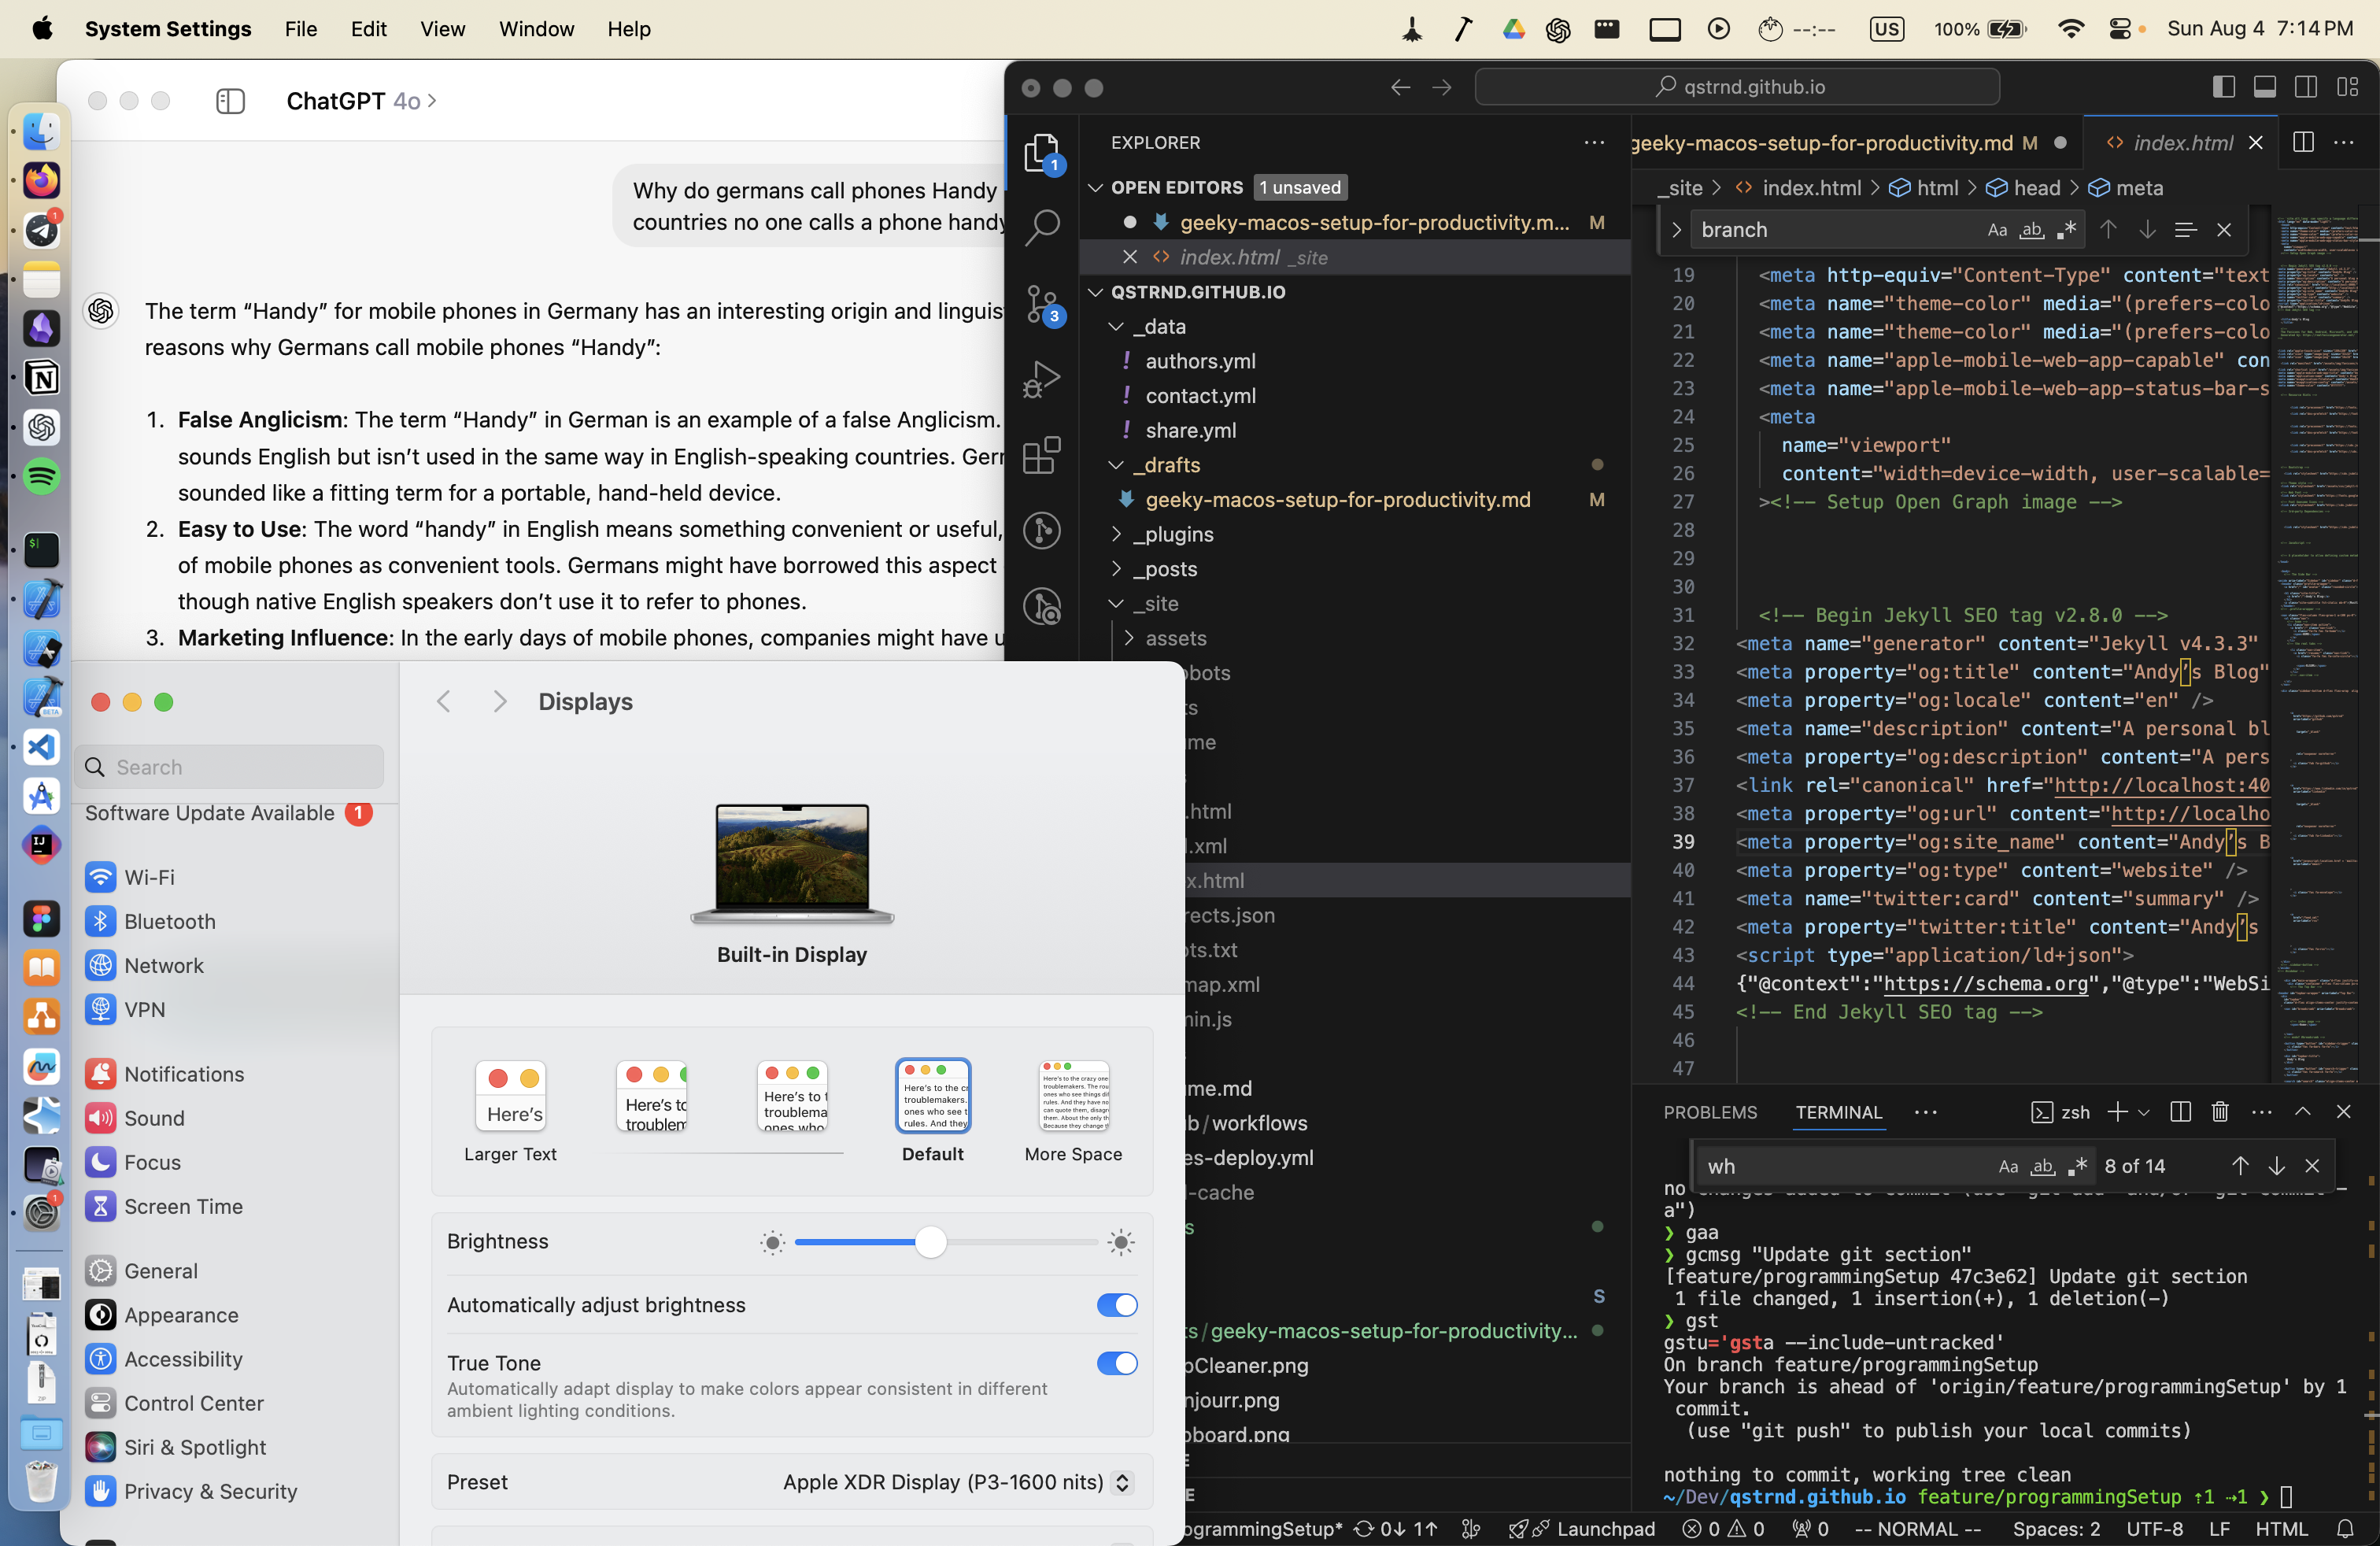 Default Space
 More Space
Keyboard Input Source
For Russian-speaking users, it can be convenient to use apps like Punto Switcher. It can be handy to remap what you’ve entered in English into Russian and vice versa. I’m not sure if it sends some data to Yandex, which is why I don’t use it myself now.
Xcodes Management
If you need to manage multiple installations of Xcode (which can be common at work), there’s a nice app called Xcodes. You can install and remove different versions and control when to update.
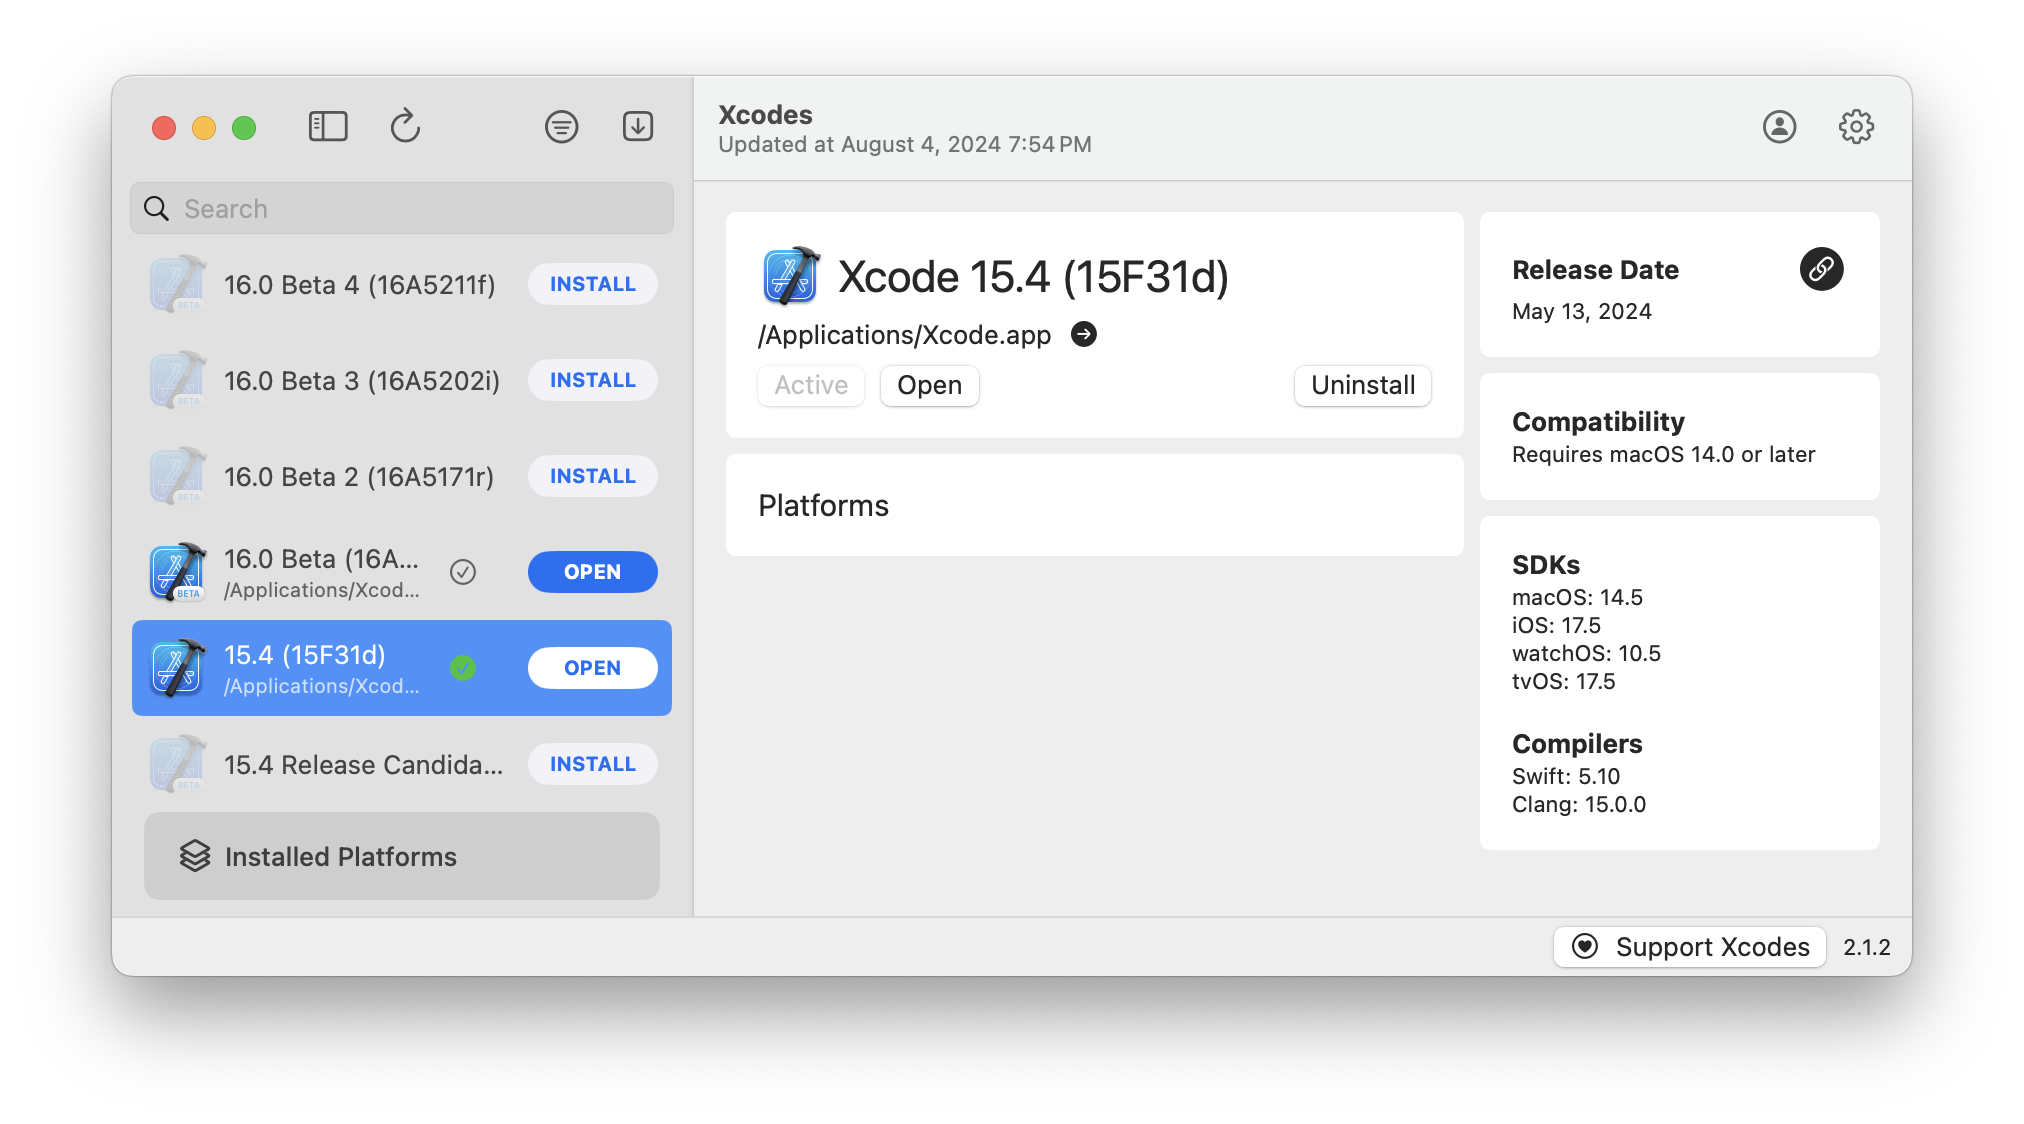 Xcodes
WWDC
You can access WWDC videos with Apple’s official website or app, but I’d recommend using this unofficial WWDC app. It has a really nice search, the ability to make a watch list, bookmark sessions, and add notes to them.
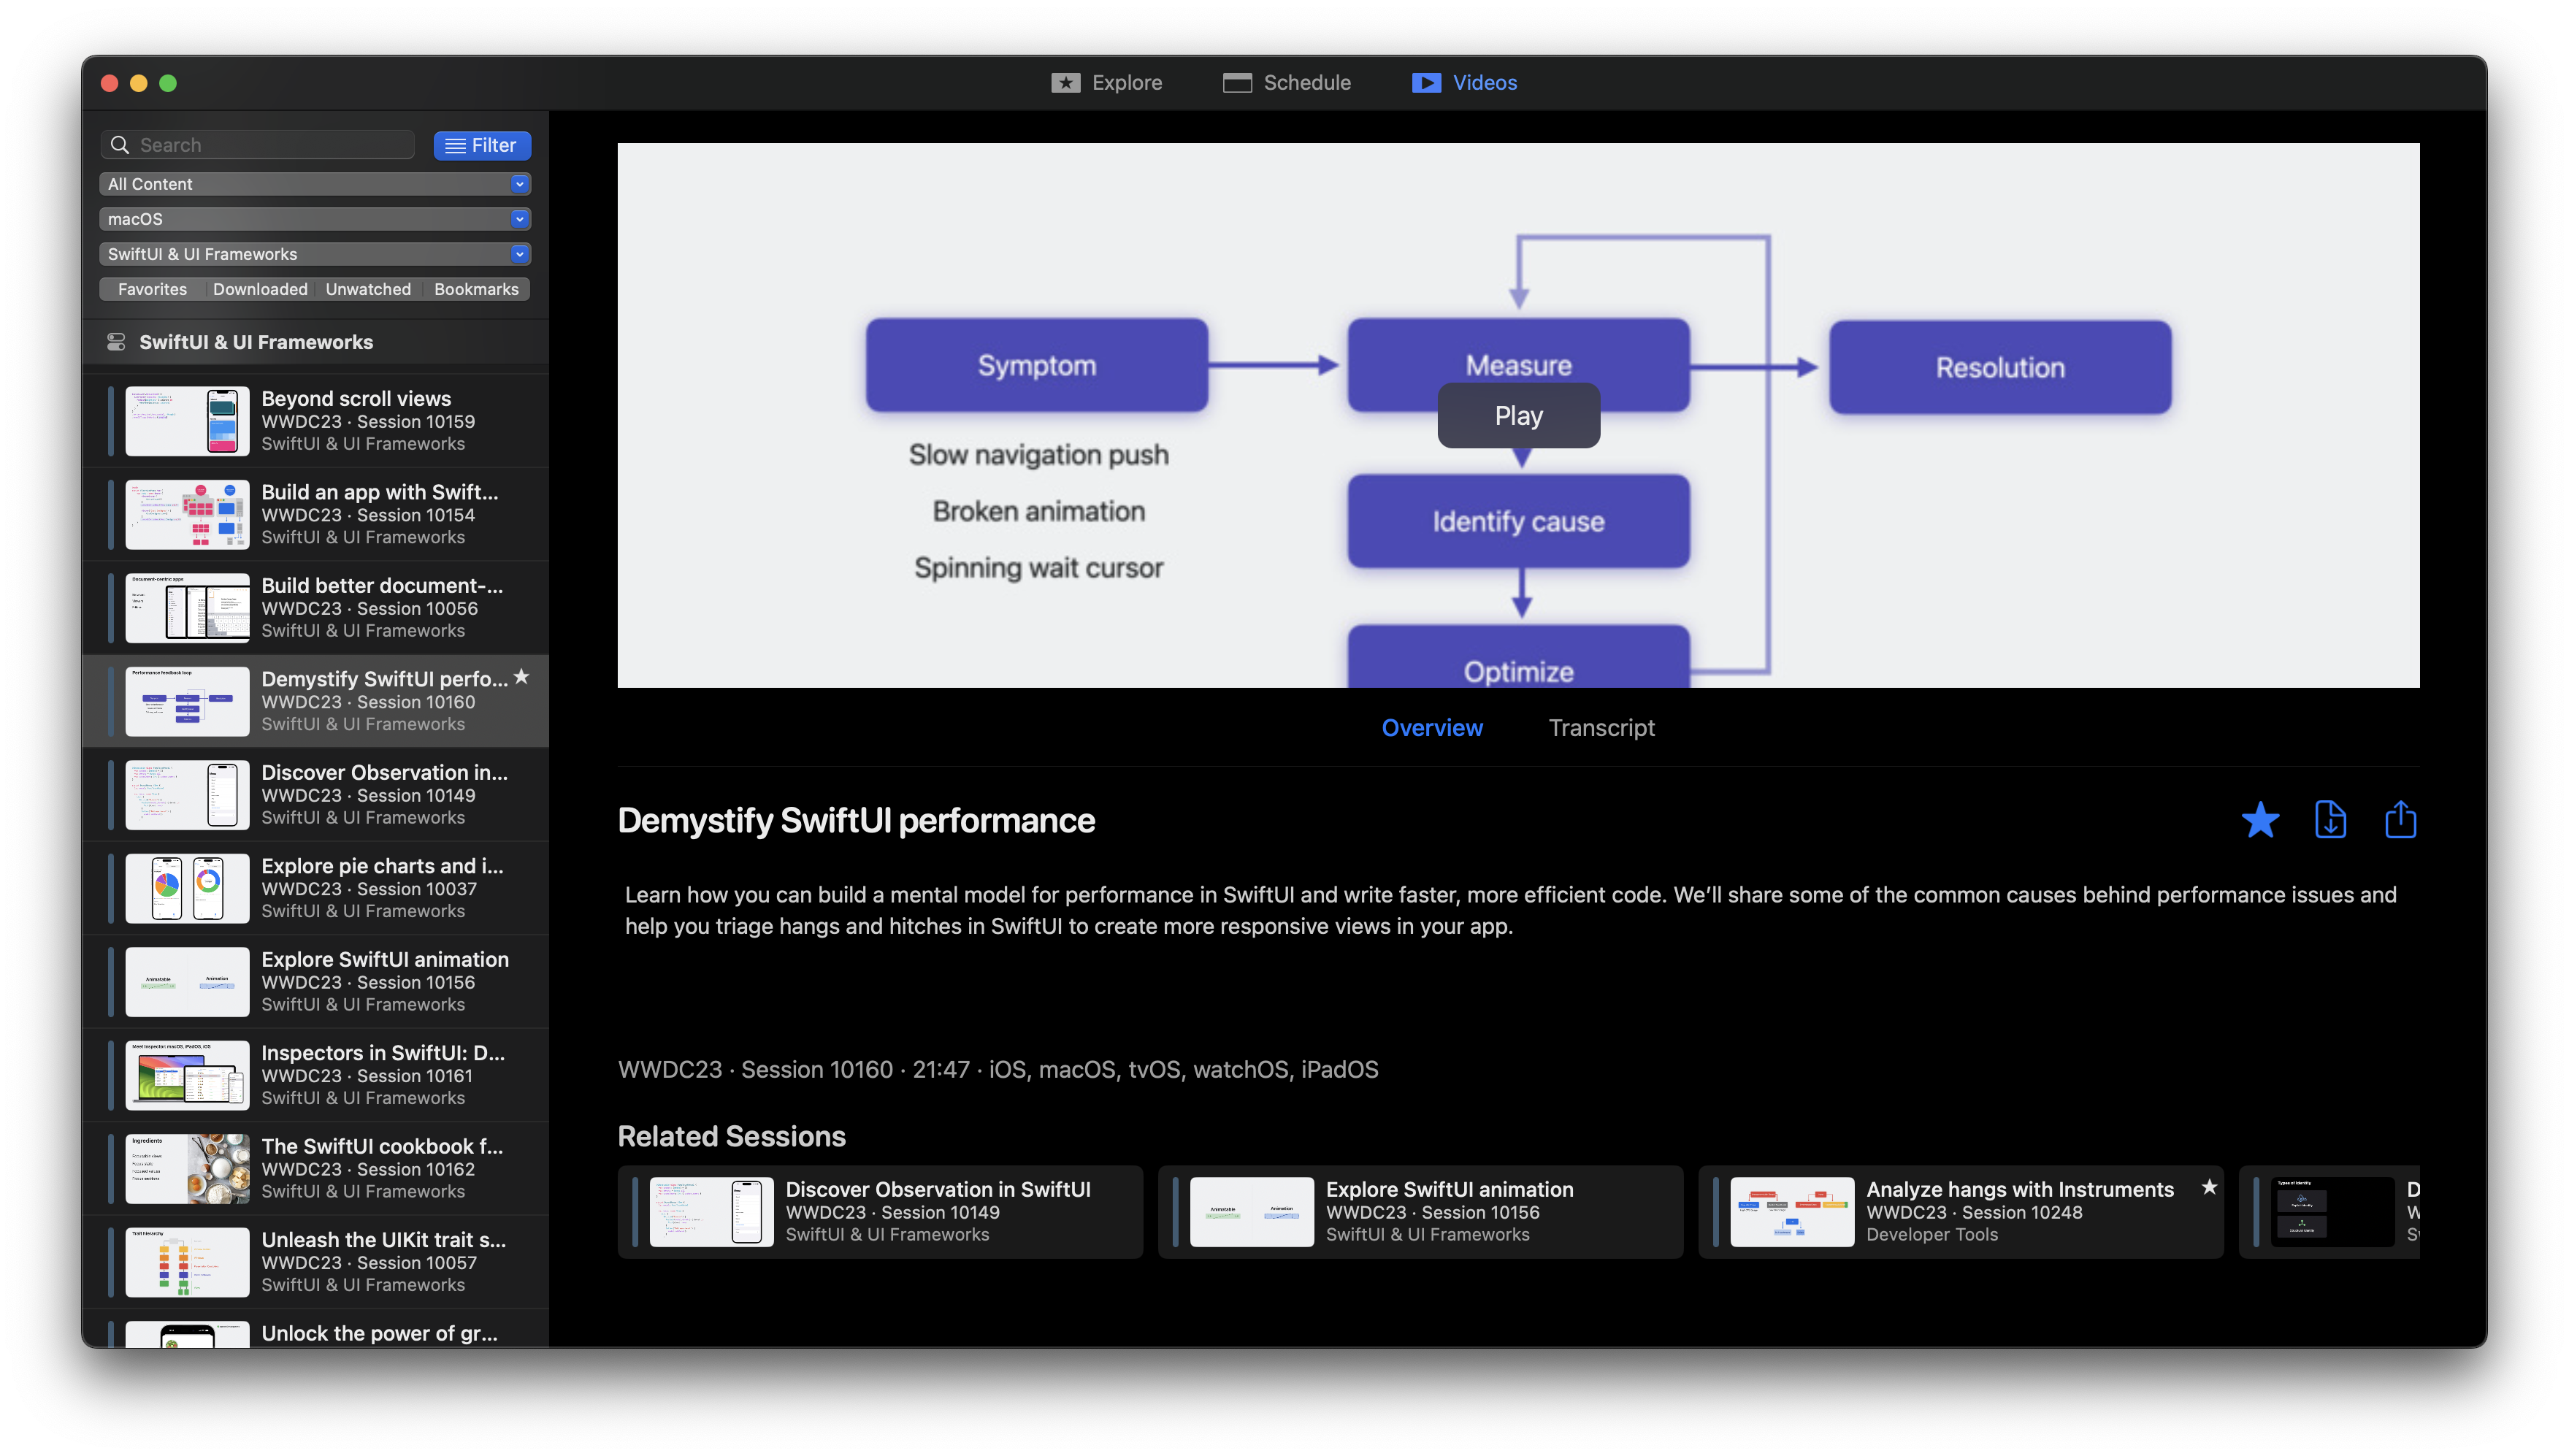 Unofficial WWDC app
Currency Conversion
I just type something like 50 EUR to AMD and it works out of the box. I think it’s not even a Raycast feature but a system search feature, which is available even on iOS.
Diagnostics & Stats
I don’t use widgets or special tools for diagnostics. The most “advanced” stuff I do here is to check what cycle count my battery has. But I do use Activity Monitor sometimes, mostly to find out what makes my Mac lag sometimes (and it does lag; I experience crashes sometimes and so on — nothing is perfect).
And I also enable battery percentage in the Menu Bar item. I still want to be precise about it.